Enable RDP/SSH over HTTPS: Applicable for AWS based labs
CloudLabs provides a feature to access the virtual machine over a browser for AWS based labs.
How to Enable RDP/SSH over HTTPS for AWS EC2.
A. Follow the below configurations for CloudLabs AWS Template.
Note: Click on the Following URL for a detailed documentation on how to add a CloudLabs AWS template: How to Add a CloudLabs AWS Template
Navigate to CloudLabs Template(1) that you have created then click on edit button under Actions pane(2)
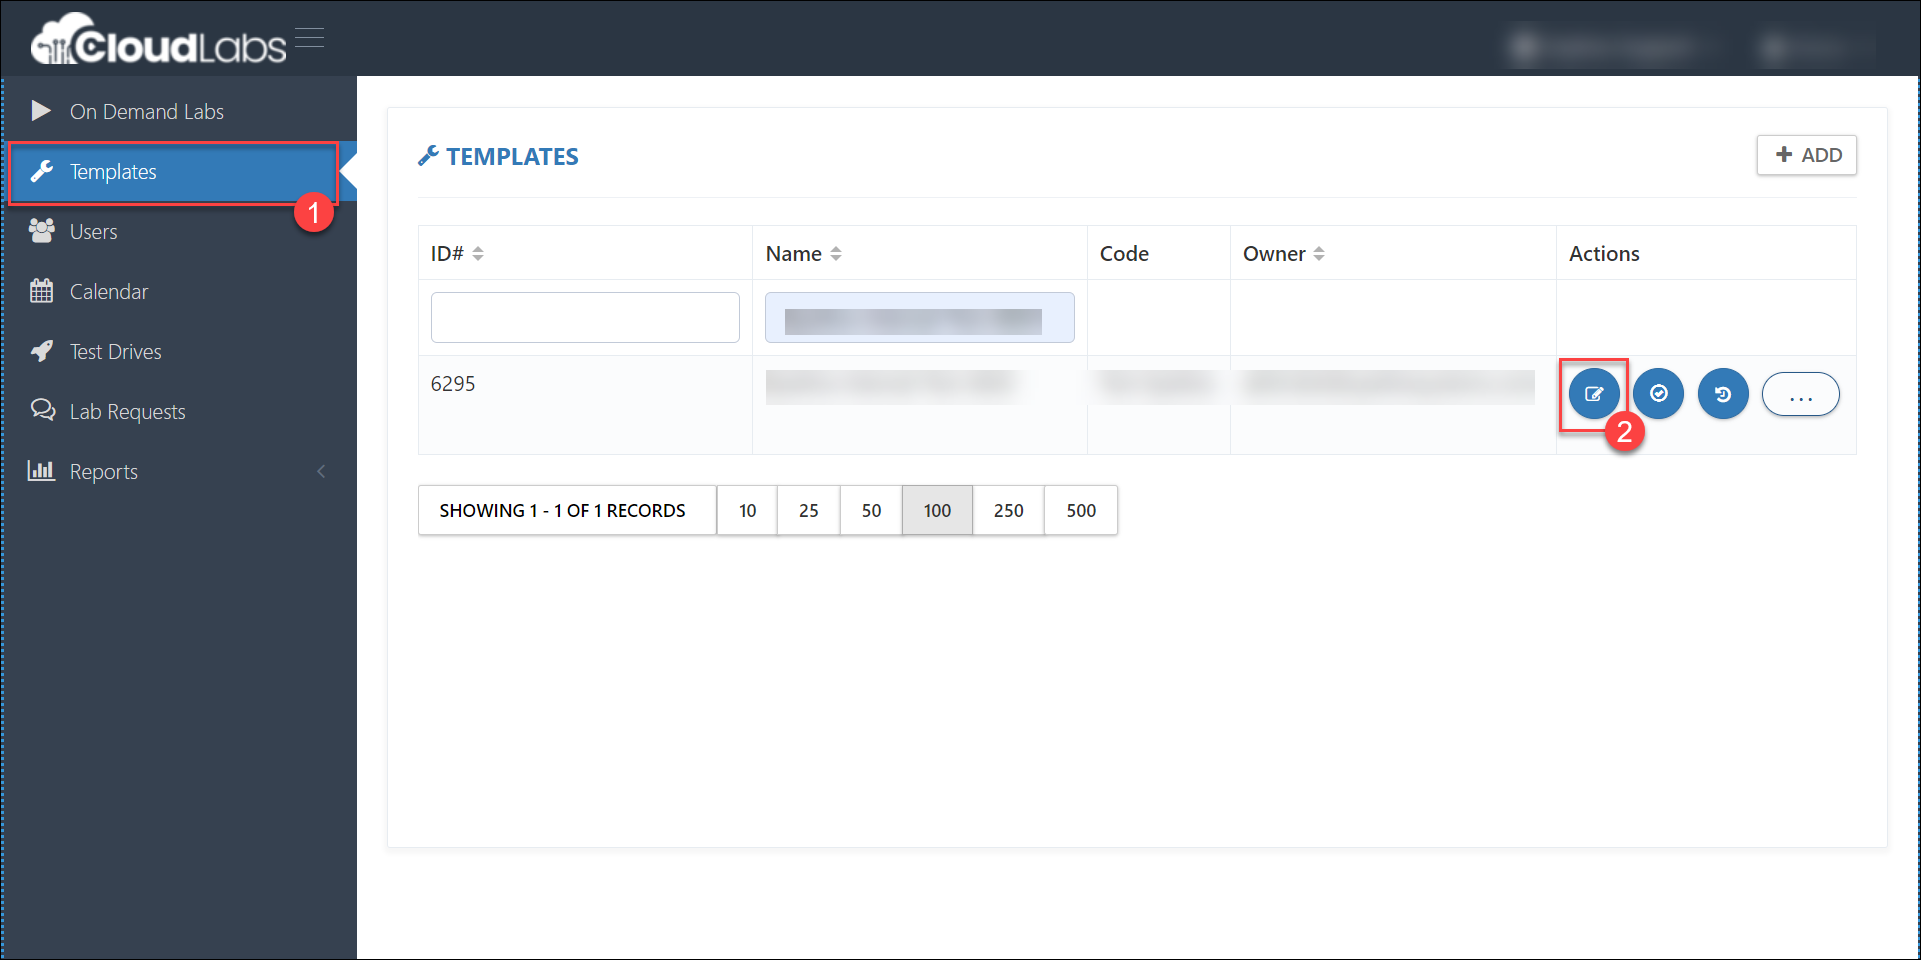
Once you click on edit option in template you will find the option to Enable EC2 Access Over Http and mark it as enabled.
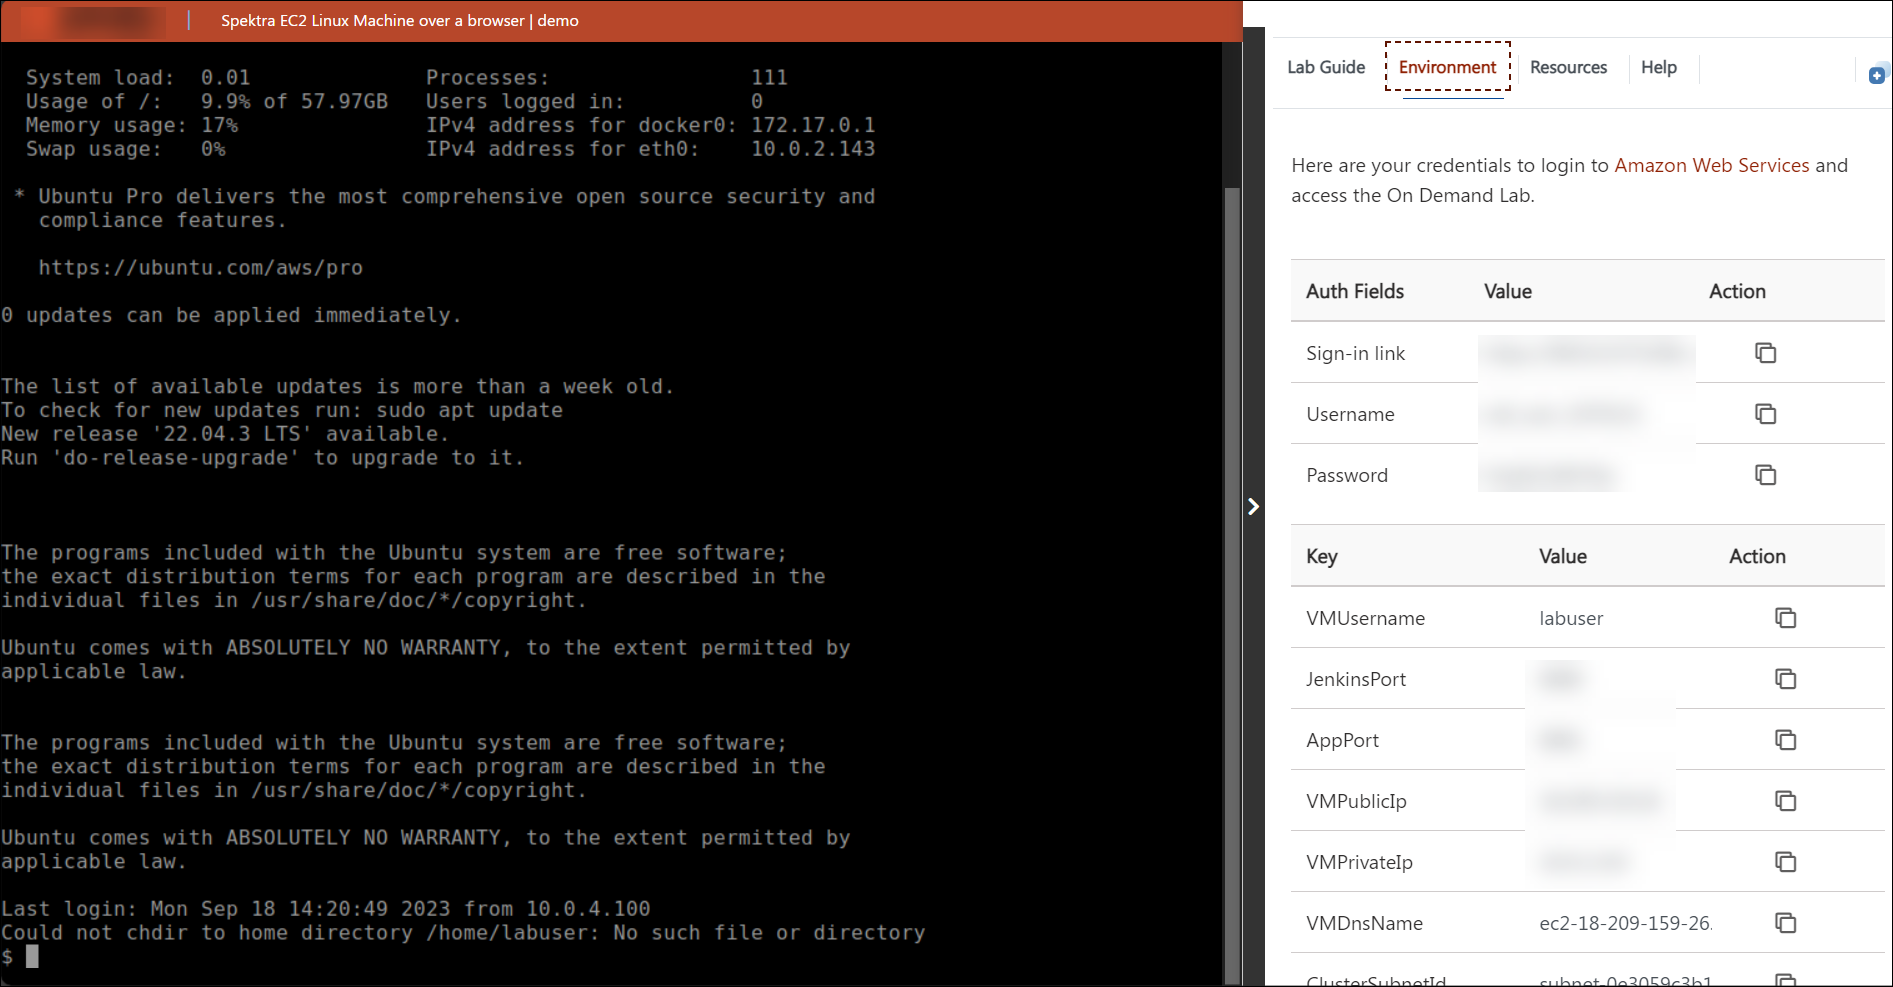
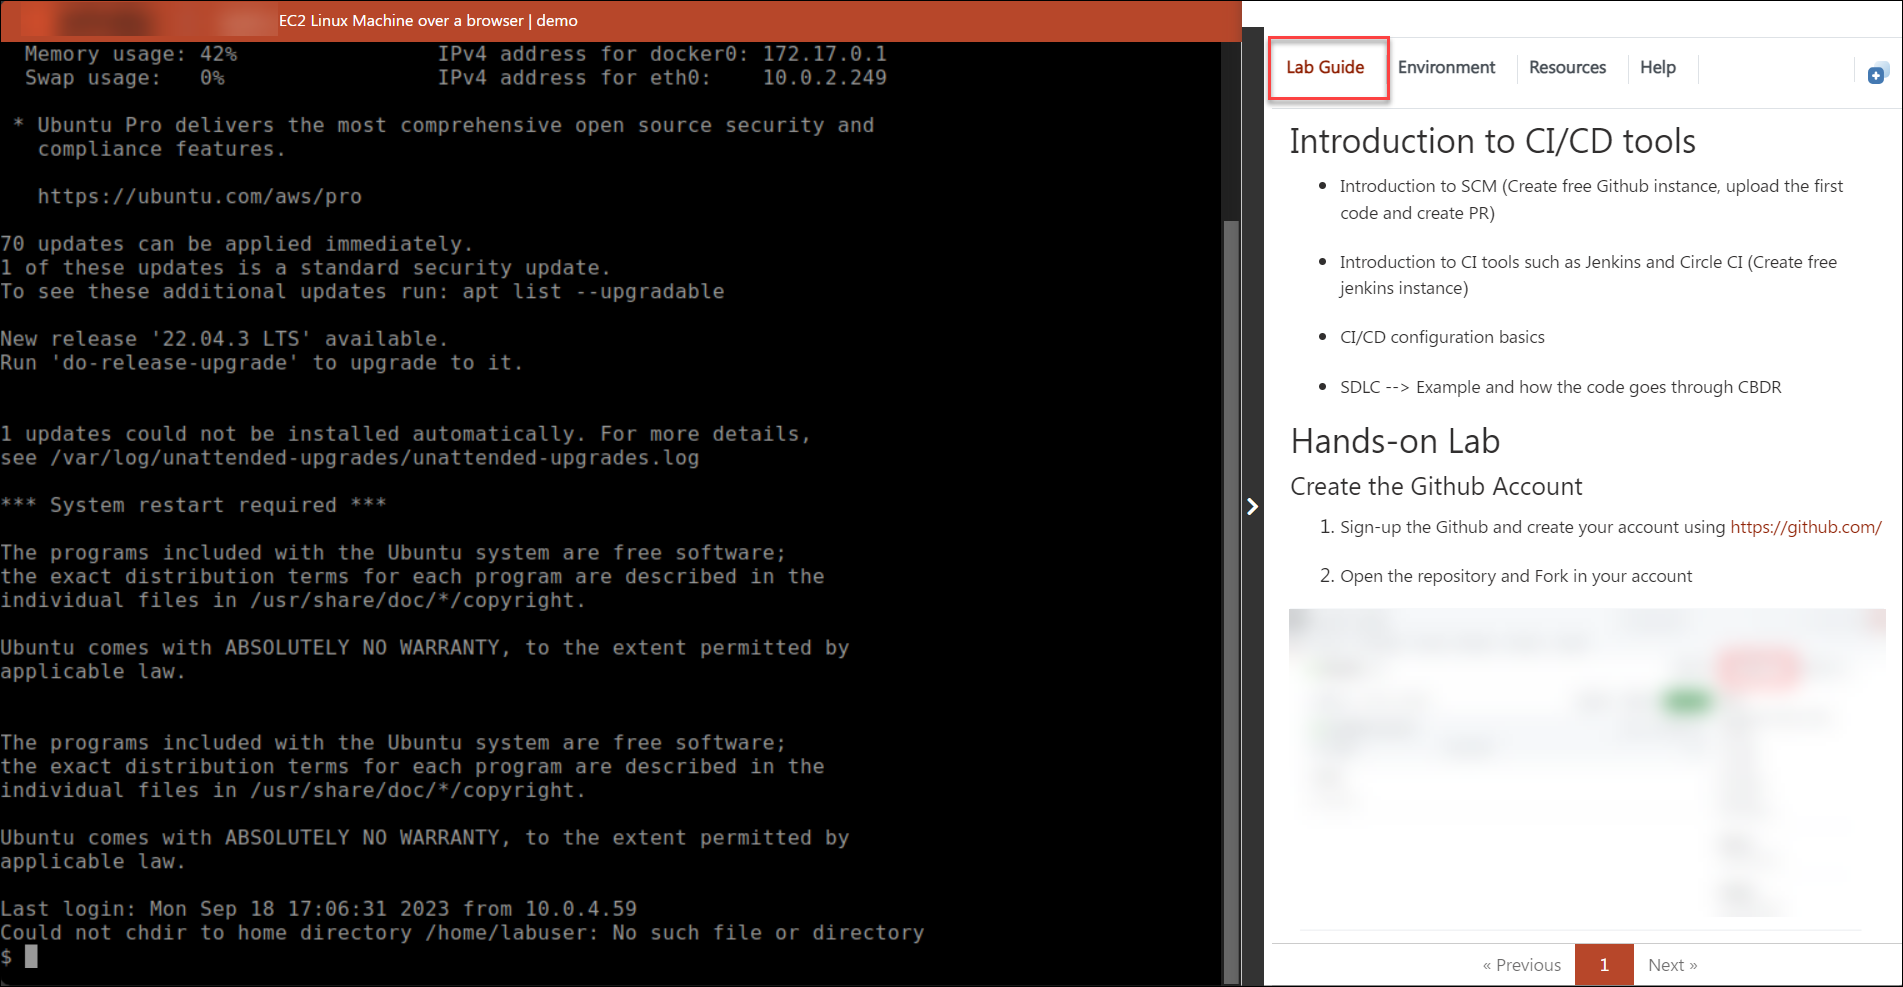
We need to add "Virtual Machine Configuration" as it is required to allow users accessing the VM over HTTPS (over a web browser). CloudLabs will automatically take the below inputs from this VM configuration and will not ask users to enter these details manually. Once the lab is ready, the environment users receive will include a VM on the left side of the browser and the Lab Guide on the right as shown in below image.
Click on add Virtual Machine Configuration, and then add the following values:
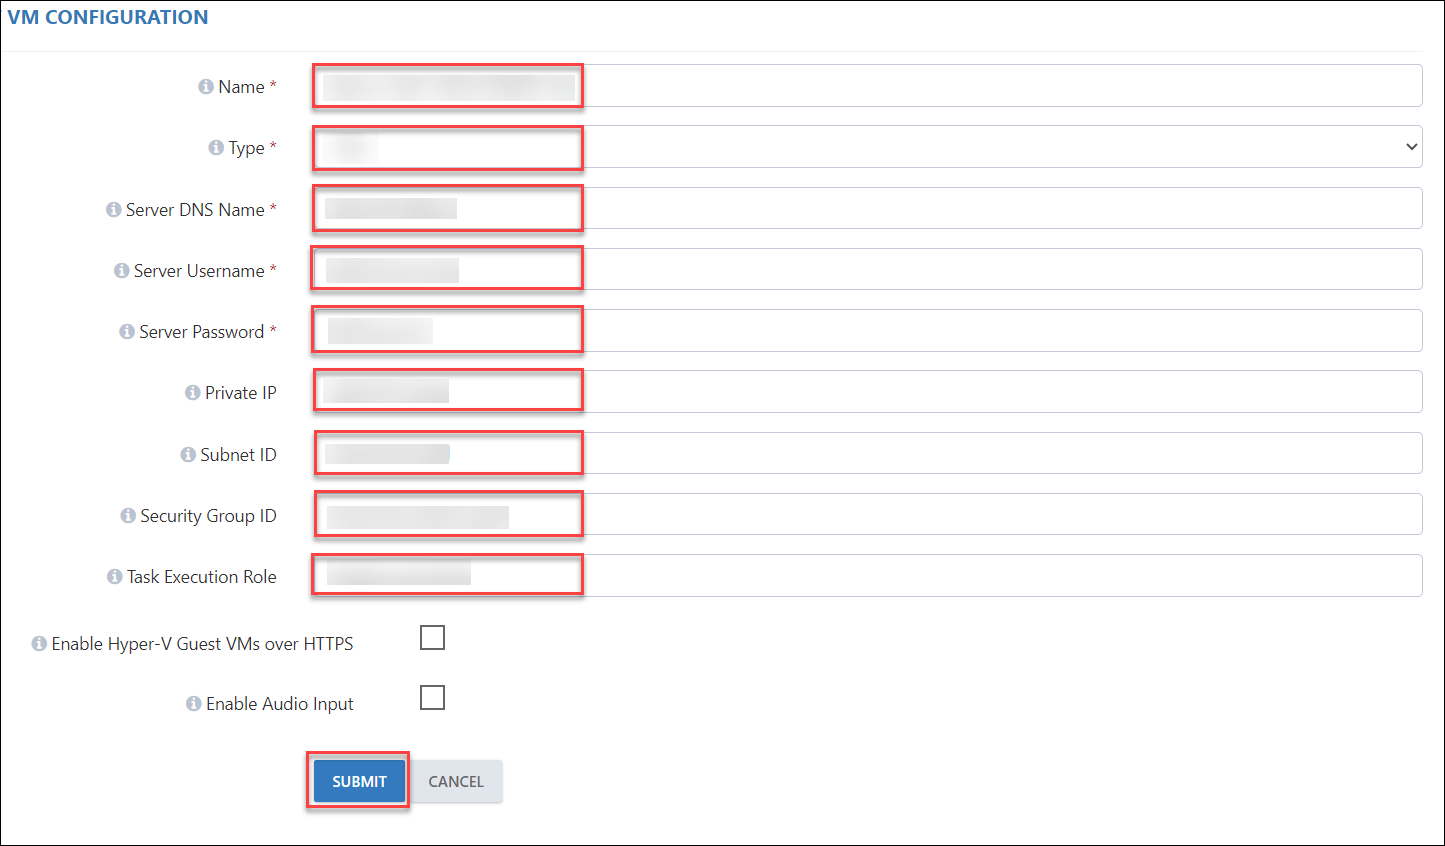
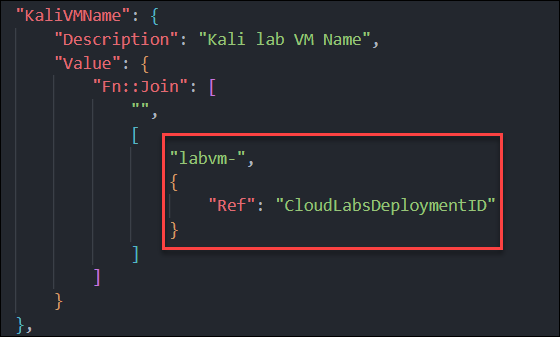
Name: Enter the exact name of your VM that is reflecting in your CFT Template output parameter.
Note: CloudLabs automatically assigns a six-digit Deployment ID (CloudLabsDeploymentID) to each deployment. This DID can be declared as a parameter and its value can be obtained using declaring paramete value as a "GET-DEPLOYMENT-ID". Check out the sample CFT template and parameters file below for references:
Sample cloudformation template: cloudformation template
Parameters File: Parameters File
For an Example: If you are giving a VM Name as a 'labvm-' and concating Deployment id as a suffix then VMName will look like labvm-(XXXXXX). (Here XXXXXX is a six digit unique id)
Type: Here you have to choose the Type of the protocol that is required for remote access of the virtual machine. There are two type of options - RDP and SSH.
RDP: Choose the protocol as RDP if you are having Windows Virtual Machine or Linux with xrdp support.
SSH: Choose the protocol as SSH if you are having the Linux Virtual Machine with Command Line Interface.
Server DNS Name: From your CFT Template, pick up the output parameter that has the VM DNS name stored in it and paste it into the below mentioned field.

Server User Name: From your CFT Template, pick up the output parameter that has the VM Username stored in it and paste it into the below mentioned field.
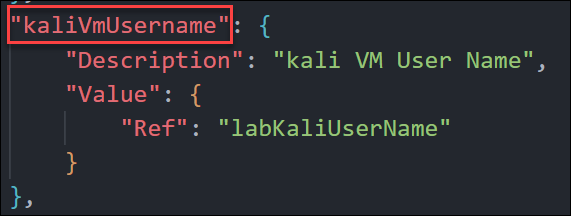
Server Password: From your CFT Template, pick up the output parameter that has the VM Password stored in it and paste it into the below mentioned field.

Private IP: From your CFT Template, pick up the output parameter that has the VM Private IP stored in it and paste it into the below mentioned field.
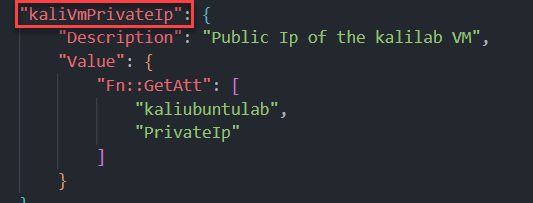
Subnet ID: From your CFT Template, pick up the output parameter that has the Cluster Subnet ID stored in it and paste it into the below mentioned field.

Security Group ID: From your CFT Template, pick up the output parameter that has the stored Security Group ID in it and paste it into the below mentioned field.

Task Execution Role: From your CFT Template, pick up the output parameter that has the stored Task Execution Role in it and paste it into the below mentioned field.

Click on SUBMIT to save the configurations.
B. Steps to be performed for Configuring in ODL(On Demand Lab).
Note: Click on the Following URL for a detailed documentation on how to add an CloudLabs Azure template: How to create an On Demand Lab
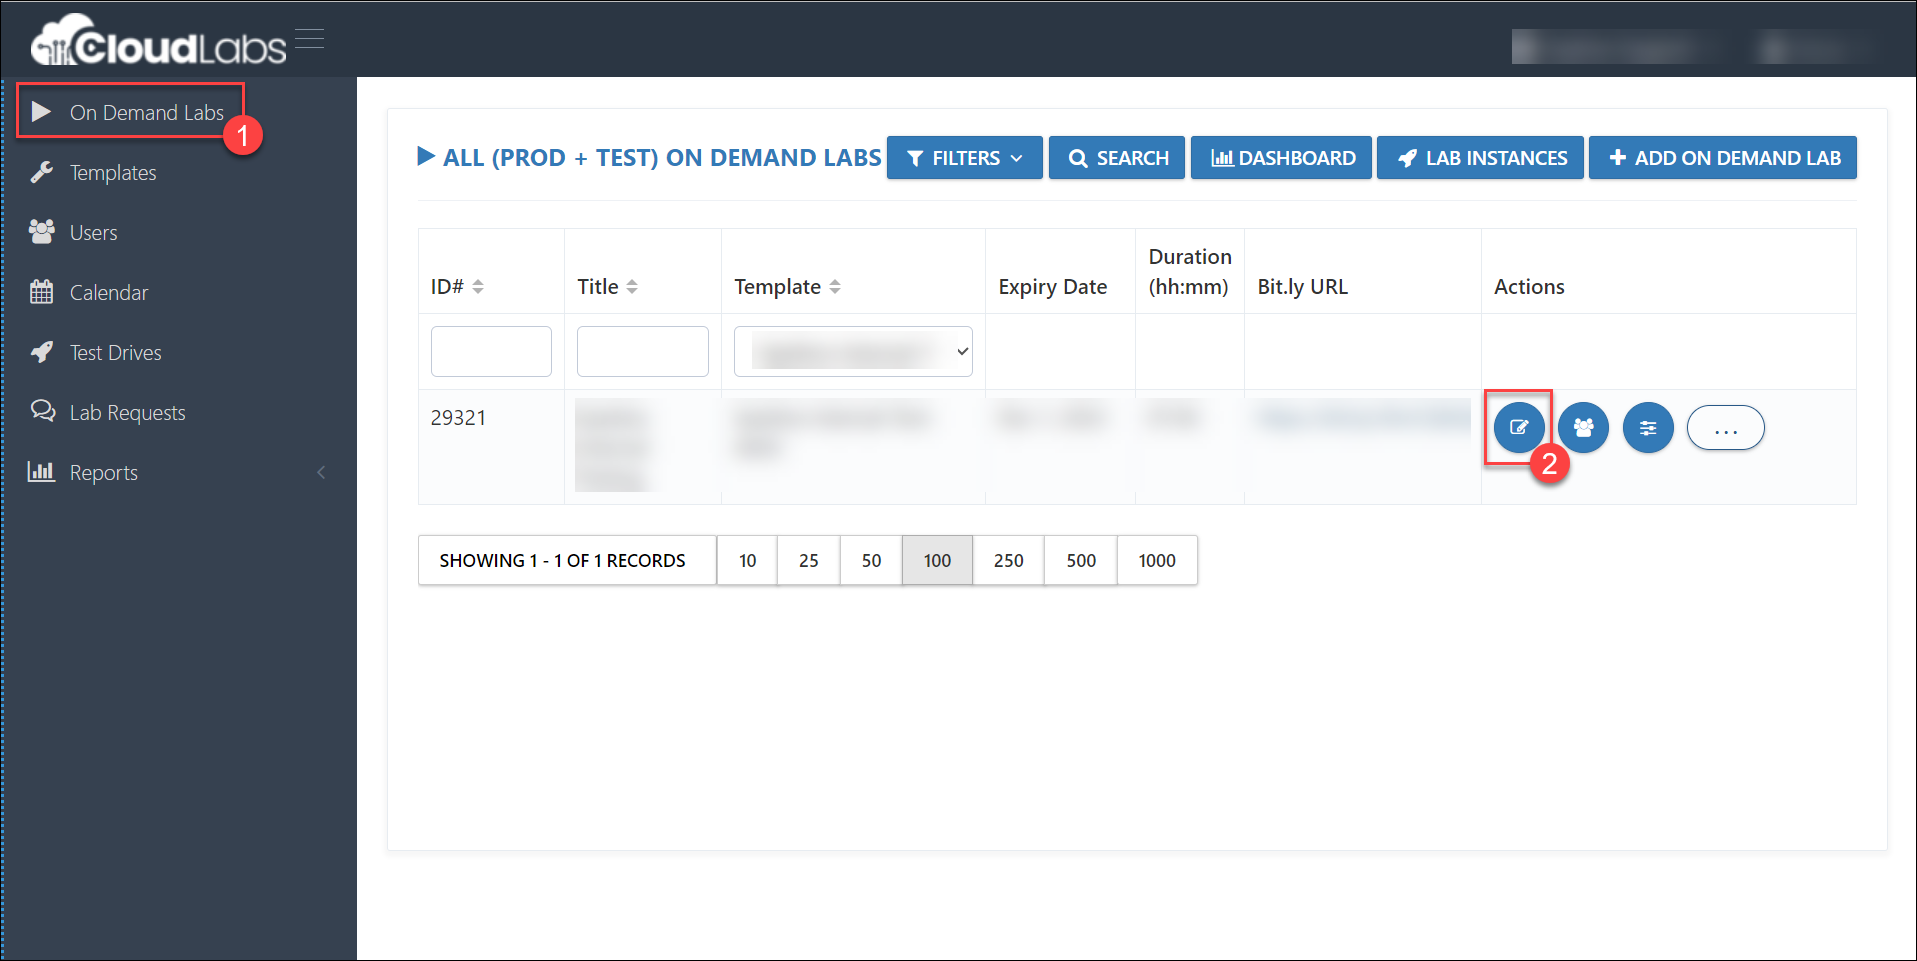
Navigate to the On Demand Lab Page click on the ODL that you have created(1), and then Click on Edit button(2) under the Action pane of the ODL where you can find the flag for ACI Deployment Style and select the value as a Default from the dropdown.

Enable the flag Enable Hot Instance and then click on Check on Hot Instance button to Add Hot Instance.
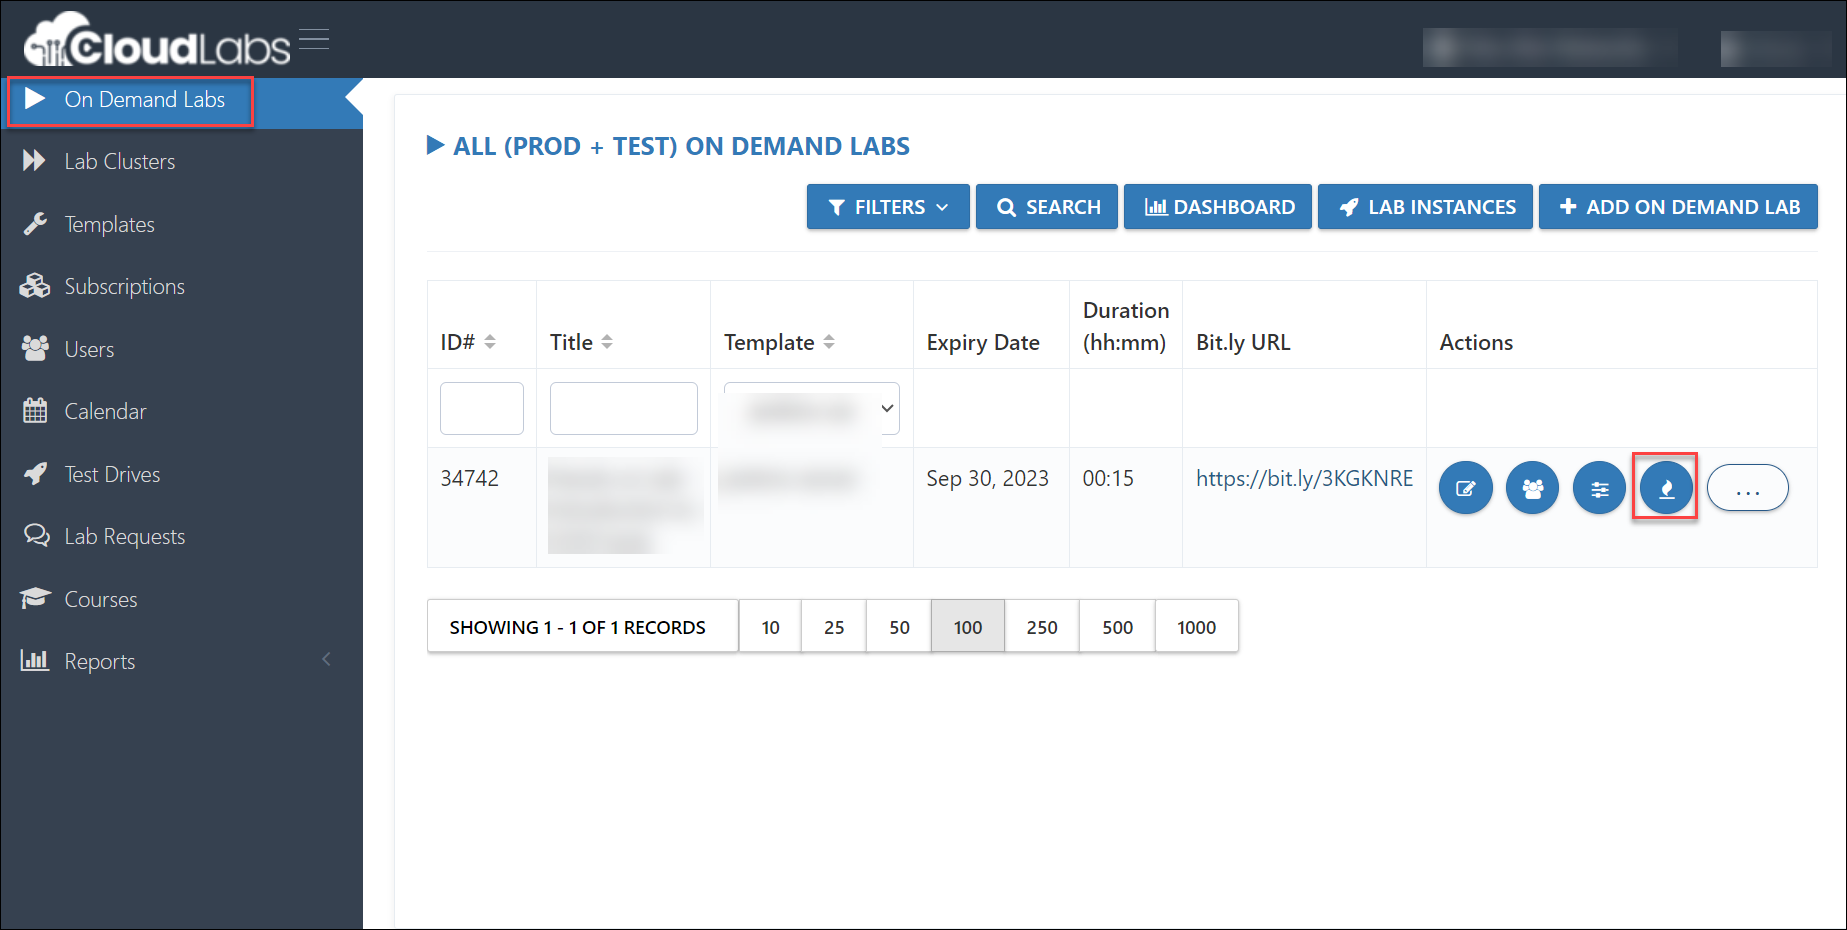
Click on the +ADD button to Add Hot Instances and then Add required number of Hot Instances.

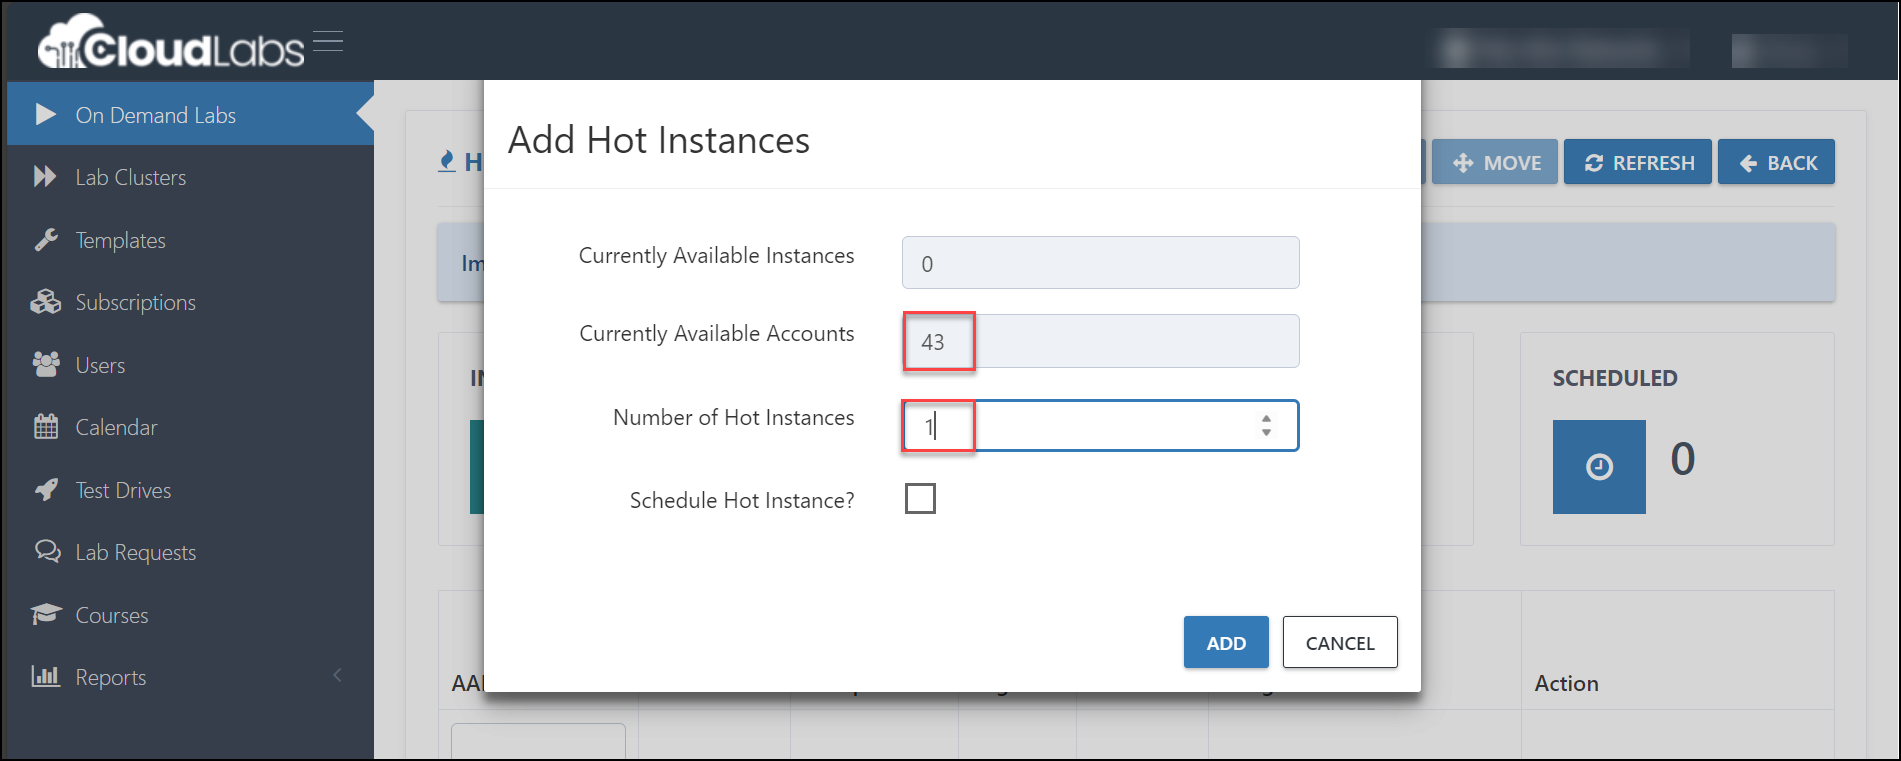
Once the status of the Hot Instance shows Succeeded user can register for the lab.

Note: Hot Instance is basically a Pre-Deployed Environment which will get assigned to users when they register for the Lab
C. Following changes needs to be added while Authoring the CloudFormation Template.
- Sample cloudformation template: cloudformation template
- Parameters File: Parameters File
The following additional Resources, Parameters, and Outputs that CloudLabs requires must be added to your EC2-VM CloudFormation Template. You should also make sure to modify the fields marked between tags in accordance with your VPC Infrastructure.
Resources mentioned below such as TaskExecution Role ClusterSubnet and Cluster Security Group CloudLabs uses to deploy the ECS Service which helps to access the VM over Https
a. In the parameters section:
"Parameters": {
    "CloudLabsDeploymentID": {
        "Description": "DeploymentID Value",
        "Type": "String"
    },
    "CheckAcknowledgement": {
        "Type": "String",
        "Default": "TRUE"
    },
    "clgclusterSubnetCidr": {
        "Type": "String",
        "Default": "< any custom address range from with in vpc >"
    },
    "AmazonECSTaskExecutionRolePolicy": {
        "Type": "String",
        "Default": "arn:aws:iam::aws:policy/service-role/AmazonECSTaskExecutionRolePolicy"
    }
}
b. In the Resources Section
"Resources":{
    "TaskExecutionRole": {
        "Type": "AWS::IAM::Role",
        "Properties": {
            "AssumeRolePolicyDocument": {
                "Version": "2012-10-17",
                "Statement": [
                    {
                        "Effect": "Allow",
                        "Principal": {
                            "Service": [
                                "ecs-tasks.amazonaws.com"
                            ]
                        },
                        "Action": [
                            "sts:AssumeRole"
                        ]
                    }
                ]
            },
            "Path": "/",
            "ManagedPolicyArns": [
                {
                    "Ref": "AmazonECSTaskExecutionRolePolicy"
                }
            ],
            "Tags": [
                {
                    "Key": "Name",
                    "Value": {
                        "Fn::Join": [
                            "",
                            [
                                "TaskExecutionRole-",
                                {
                                    "Ref": "CloudLabsDeploymentID"
                                }
                            ]
                        ]
                    }
                }
            ]
        }
    },
    "clgClusterSubnet": {
        "Type": "AWS::EC2::Subnet",
        "Properties": {
            "MapPublicIpOnLaunch": true,
            "VpcId": {
                "Ref": "< logical id of your custom vpc >"
            },
            "CidrBlock": {
                "Ref": "clgclusterSubnetCidr"
            },
            "Tags": [
                {
                    "Key": "Name",
                    "Value": {
                        "Fn::Join": [
                            "",
                            [
                                "clgClusterSubnet-",
                                {
                                    "Ref": "CloudLabsDeploymentID"
                                }
                            ]
                        ]
                    }
                }
            ]
        }
    },
    "clusterSubnetRouteTableAssociation": {
        "Type": "AWS::EC2::SubnetRouteTableAssociation",
        "Properties": {
            "SubnetId": {
                "Ref": "clgClusterSubnet"
            },
            "RouteTableId": {
                "Ref": "< logical id of your main route table >"
            }
        }
    },
    "clgSg": {
        "Type": "AWS::EC2::SecurityGroup",
        "Properties": {
            "GroupDescription": "this is for container",
            "GroupName": "clgSg",
            "VpcId": {
                "Ref": "< logical id of your custom vpc >"
            },
            "SecurityGroupIngress": [
                {
                    "FromPort": 443,
                    "ToPort": 443,
                    "IpProtocol": "tcp",
                    "CidrIp": "0.0.0.0/0"
                },
                {
                    "FromPort": 443,
                    "ToPort": 443,
                    "IpProtocol": "tcp",
                    "CidrIpv6": "::/0"
                }
            ],
            "Tags": [
                {
                    "Key": "Name",
                    "Value": {
                        "Fn::Join": [
                            "",
                            [
                                "clgSg-",
                                {
                                    "Ref": "CloudLabsDeploymentID"
                                }
                            ]
                        ]
                    }
                }
            ]
        }
    }
}
c. In the Outputs Section:
"Outputs":{
    "clusterSubnetId": {
        "Description": "The ID of the ClusterSubnet",
        "Value": {
            "Ref": "clgClusterSubnet"
        }
    },
    "TaskExecutionRole": {
        "Description": "The Arn of Role that is utilised by ECS Task Definition",
        "Value": {
            "Fn::GetAtt": [
                "TaskExecutionRole",
                "Arn"
            ]
        }
    },
    "clusterSecurityGroupId": {
        "Description": "The SG ID of the Cluster",
        "Value": {
            "Ref": "clgSg"
        }
    }
}
D. End User Experience
After successful registration and launch of the Lab environment, users receive will include a VM on the left side of the browser and the Lab Guide on the right as shown in below image.
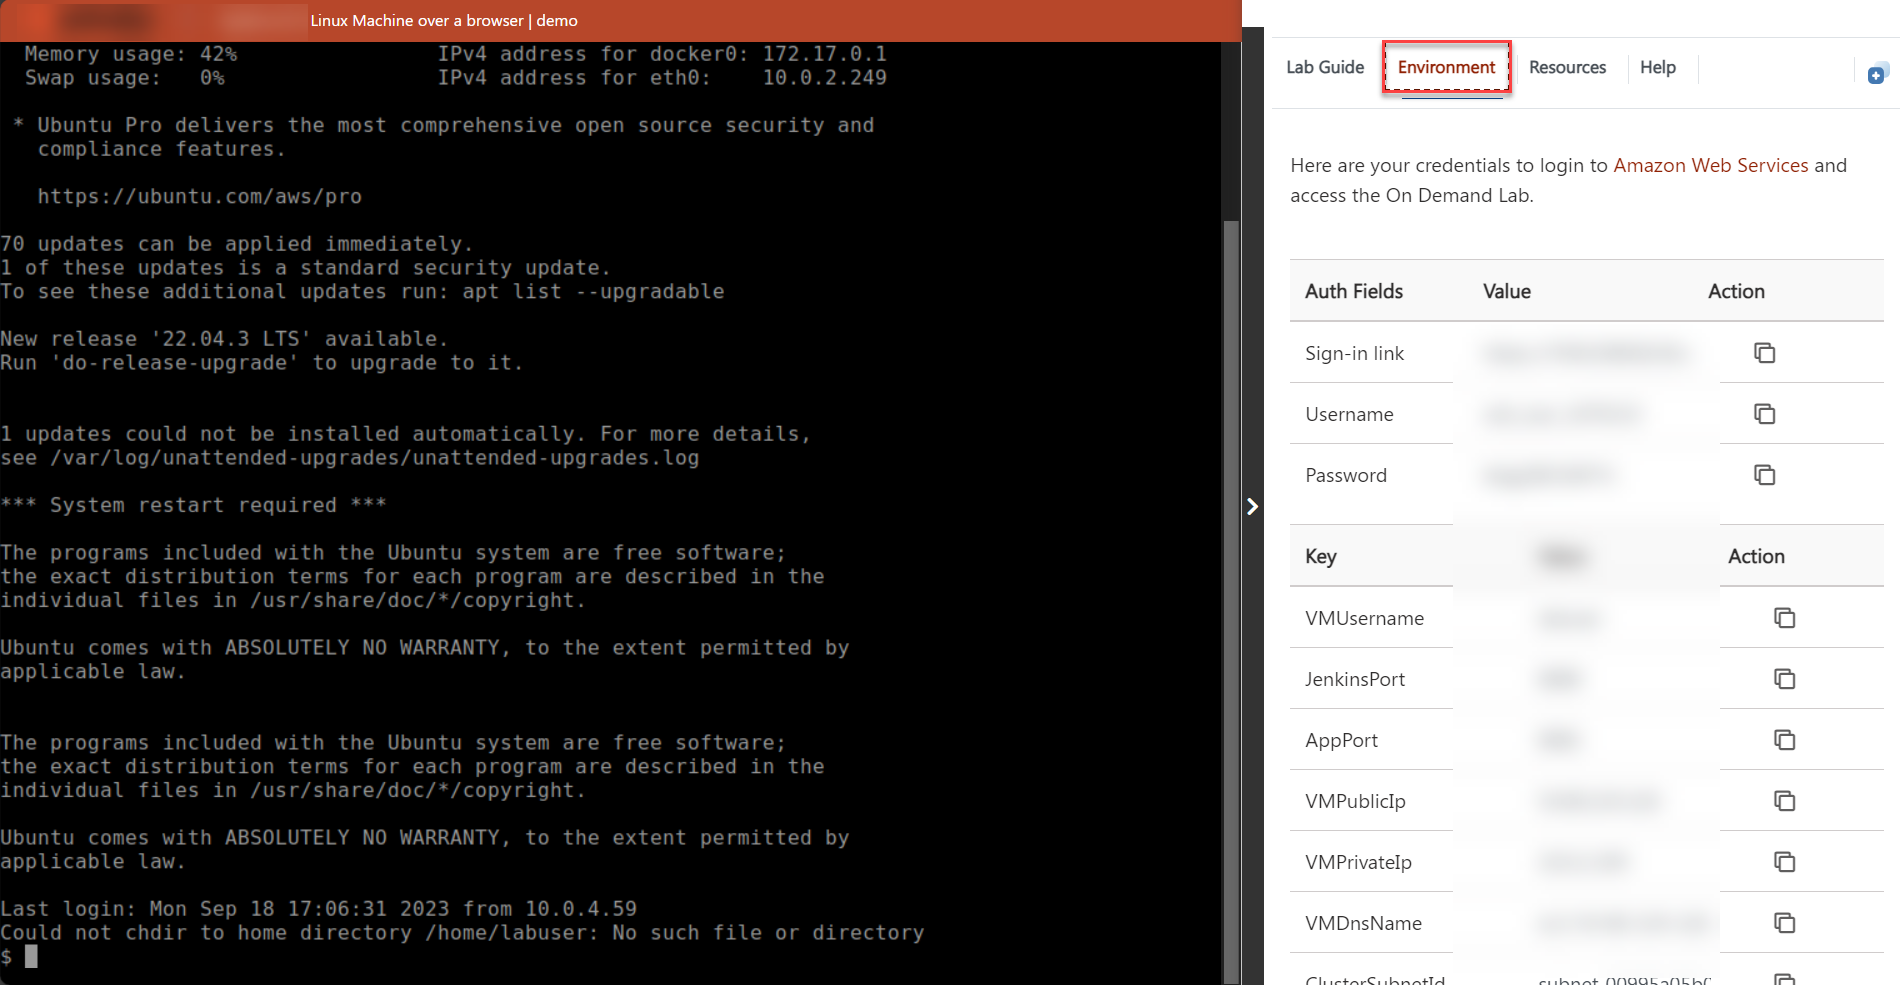
Click on the Environment tab to get the Cloud Credentials and required output parameters.
Click on the Resources tab to verify the status of the VM and control its state:
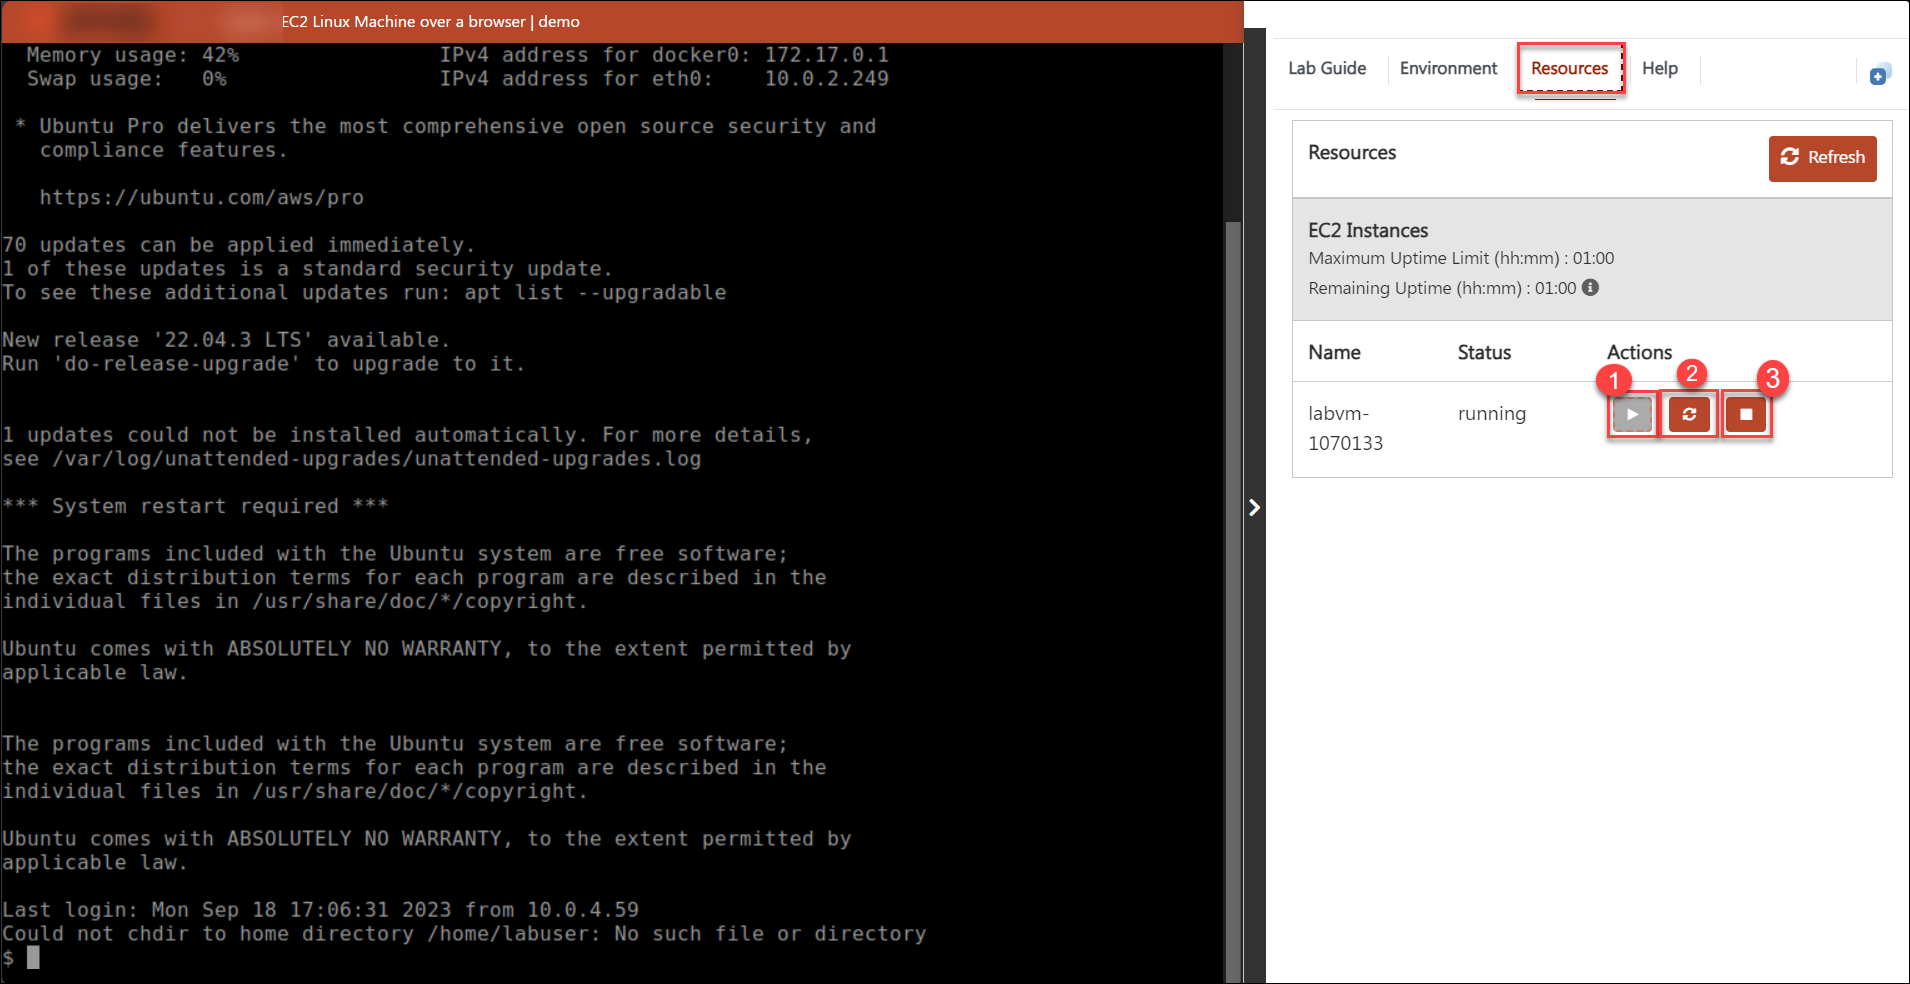
Start button: Click on the button(1) To Start the Virtual Machine if it is in Stopped/Deallocated state.
Restart button: Click on the button(2) to restart the Virtual Machine.
Stop button: Click on the button(3) to stop the Virtual Machine.