Add or Schedule Hot Instances
Overview
Hot instances refer to active lab environments pre-provisioned in advance of the actual lab. They remain unassigned until a user registers and launches the lab.
This eliminates lab provisioning time for users, allowing them to receive their lab environment details immediately upon registration and launch without waiting for resources to be provisioned.
Consider a scenario where a lab is scheduled to begin. When users register, any unforeseen issues such as quota limitations, platform errors, or lab specific problems could disrupt the live session and affect the users experience. However, by adding hot instances in advance, you can identify and resolve potential issues beforehand. This preparation ensures that when the lab goes live, users will have a seamless experience with no delays or disruptions, guaranteeing smooth and uninterrupted access to the lab environment.
Adding Hot Instances
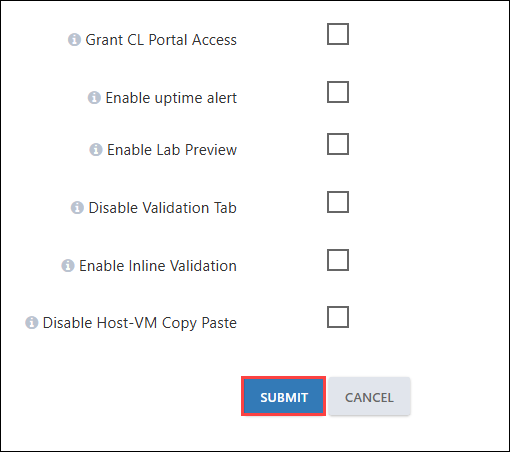
In order to add Hot Instances, it must be enabled while creating a lab. If this option was not enabled initially, you can still enable it for existing labs (ODLs). Follow the steps below to enable the Hot Instance for existing ODLs.
Steps to Enable Hot Instances for Existing ODL:
Click on the Edit button for the specific lab.
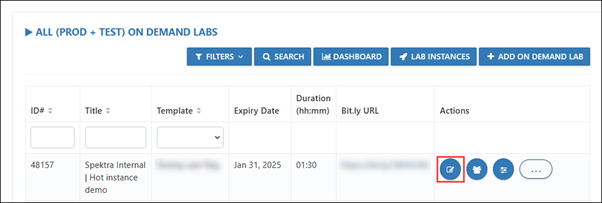
Check the Enable Hot Instances checkbox.

Submit the changes by clicking Submit.
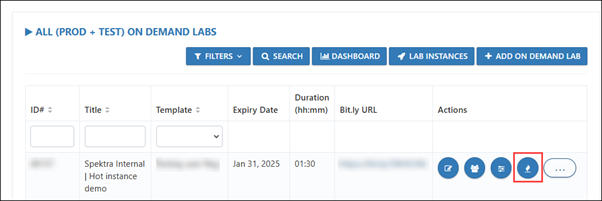
Once submitted, you can now view the Hot Instance icon and add a hot instance to your lab.
Two Ways to Add Hot Instances:
1. Instant Hot Instance Provisioning
This method lets you add hot instances immediately as needed. By specifying the number of instances to create, you can quickly deploy resources without waiting. This approach is ideal for on-demand scenarios where immediate availability is required.
Click on the Hot instance button for the particular Lab/ODL.

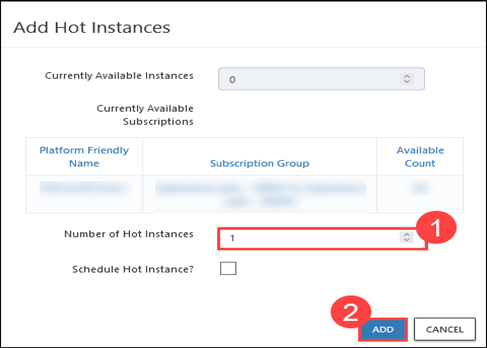
Click on the + ADD button located at the top.

Enter the number of hot instances you want to Create/Add. For example, if the expected user count for your lab is 50, then add 50 hot instances to ensure immediate availability for all users.
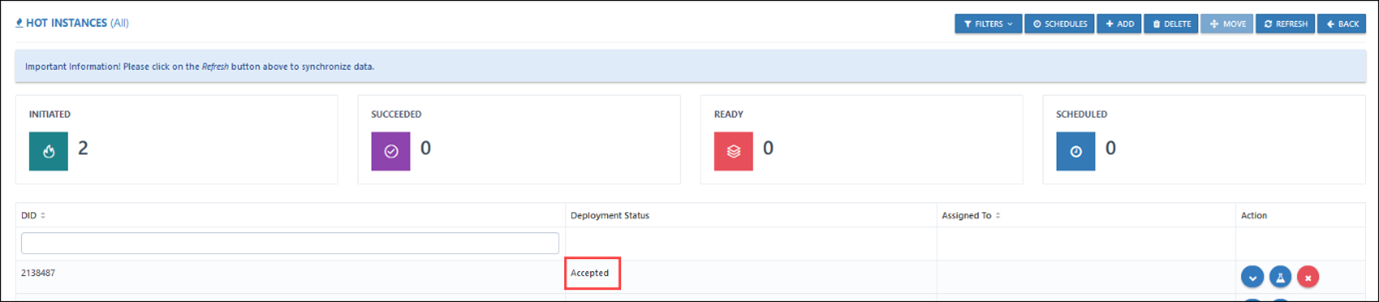
Once you have added a Hot Instance, you can view the status of the deployment. The status will progress through the following stages:
- Accepted: The Hot Instance request has been acknowledged, and deployment is initiated.
- Deploying: The system is provisioning resources and running any required scripts.
- Succeeded: The deployment is complete, and the Hot Instance is ready for use.
The time it takes to move through these stages will vary depending on the complexity of the provisioning process.
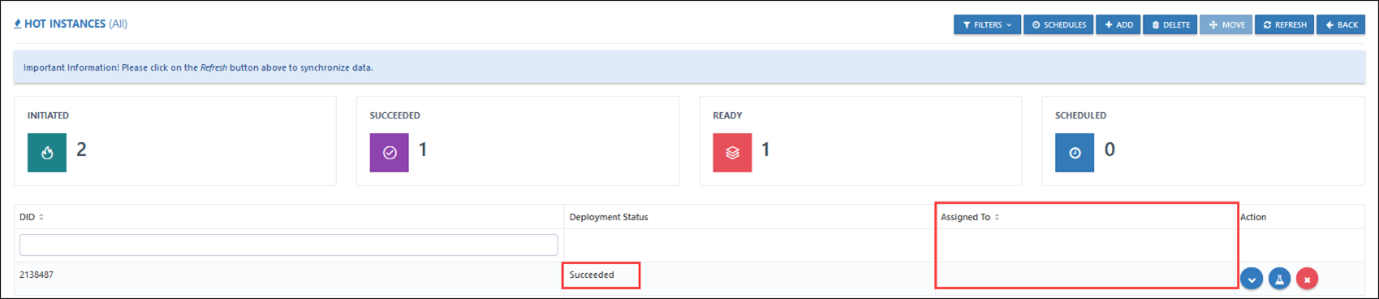
Once the deployment is succeeded, the status will be changed to succeeded as shown below. You can also notice that the assigned to field is blank as this instance is not assigned to any user yet.
2. Scheduling Hot Instances
This method allows you to plan the creation of hot instances in advance. By specifying the number of instances, selecting a time zone, and setting the desired start date and time, the system ensures the instances are ready when needed, minimizing manual effort and ensuring resource availability at the right time.
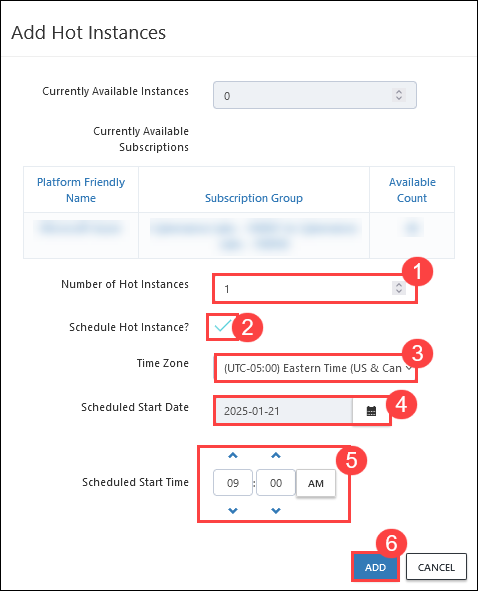
Click on the + ADD button.

Enter the number of Hot instances required, check the box to Schedule Hot instance, select the time zone, Select the Scheduled Start Date and Scheduled Start Time. Once all the required fields are provided click on Add.
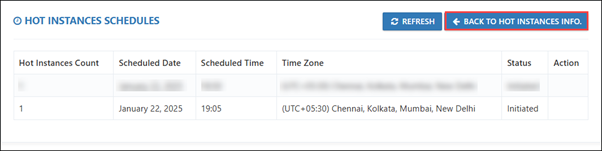
To verify if the Hot instances are scheduled, you can click on Schedules.

You will be able to see the schedule present on this page. The status will initially display as Not Yet Initiated. When the scheduled time occurs, the status will change to Initiated, indicating that the deployment process has started.

Once the status is changed to Initiated when the scheduled time occurs, you can navigate Back to the Hot Instances info to view the status of the Hot Instance deployment.
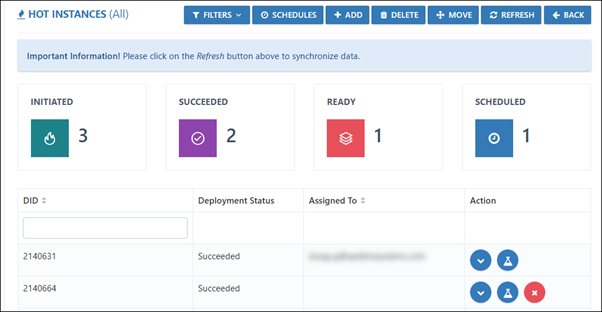
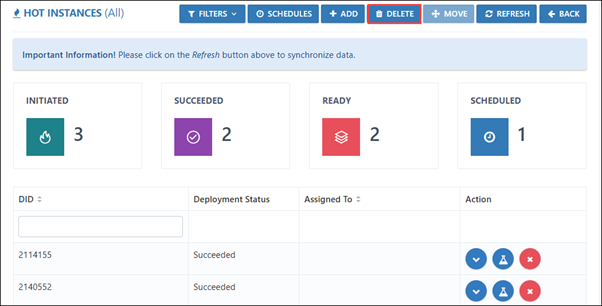
On the Hot Instance page, you can view a detailed overview of the status of Hot Instances.
Initiated: The number of Hot Instances that have started the deployment process
Succeeded: The number of Hot Instances that have been successfully deployed, which may or may not be assigned to users.
Ready: The number of Hot Instances that have been successfully deployed but are not yet assigned to any users.
Scheduled: The number of Hot Instances planned for future deployment based on a predefined schedule.
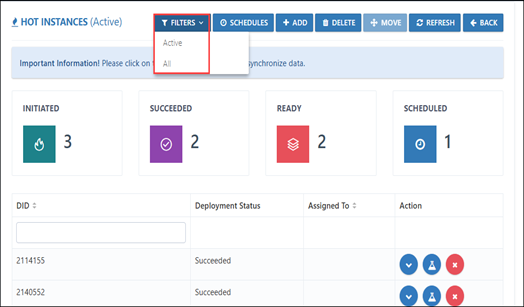
Filtering Hot Instances
This filtering feature helps you quickly locate specific Hot Instances based on their current state:
Click on Filters. option
Select either Active or All from the dropdown.
Active: Displays only the active deployments, specifically those that have succeeded.
All: Displays all deployments, including succeeded, deleted, and failed.
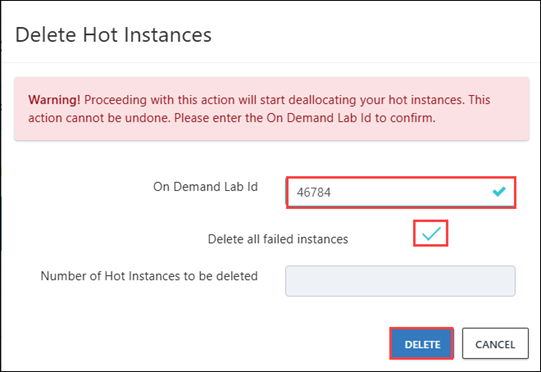
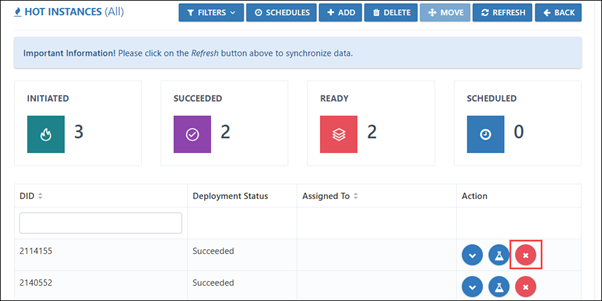
Hot Instance Deletion
If you want to delete a Hot Instance or find that you have added more Hot Instances than necessary, you have the option to remove them either individually or in bulk. Proceeding with this action will start deallocating your Hot Instances. This action cannot be undone.
Individual Deletion:
To delete a specific Hot Instance, locate the desired instance, click on the X icon next to it, and this will initiate the deployment deletion process for that particular instance.
Bulk Deletion:
To delete multiple Hot Instances at once:
Click the Delete button available on the page.
Deleting All Hot Instances: Enter the ODL ID for which you want to delete the instances. You need to provide the On-Demand Lab ID (ODL ID) along with the number of Hot Instances you wish to delete. Confirm the deletion by clicking Delete. This will remove all Hot Instances associated with the lab
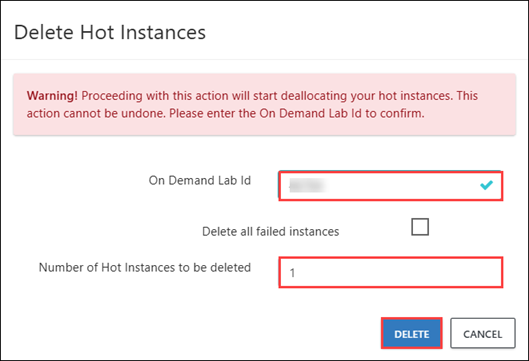
Deleting Failed Hot Instance: Enter the ODL ID for which you want to delete the instances. You need to provide the On-Demand Lab ID (ODL ID) and select the checkbox to delete all failed instances. And then Click on Delete, this will remove only the failed Hot Instances.