Authoring Lab Guides using CloudLabs UI
Overview
Lab guide authoring through UI helps the user to create a lab guide using CloudLabs. The purpose of this document is to guide users in authoring a lab using the Lab Guide Authoring through UI.
1. How to enable Lab Guide Authoring feature for CloudLabs tenant
- By default, the Lab Guide Authoring feature is disabled for the Tenants. To enable this feature, please contact the CloudLabs team before proceeding.
2. Steps to Configure Lab Guide for Template/On Demand Lab:
Lab Guide can be configured from two places:
- Template: Lab Guides configured on the template level will be used as the default Lab Guide in all linked ODLs.
- On Demand Lab: Lab Guide configured at the ODL level will be applied exclusively to the respective ODLs.
To configure Lab Guide, click on the ellipsis button in Actions column, which displays one of the below options:
- Create Lab Guide: When there is no Lab Guide configured in the selected ODL/Template.
- Modify Lab Guide When there is an existing Lab Guide in the selected ODL/Template.
Create/Modify Lab Guide menu item on Template Level
Create/Modify Lab Guide menu item on ODL Level
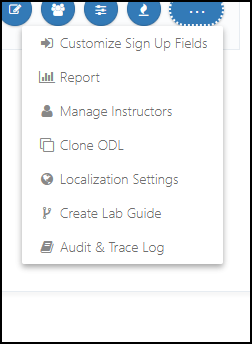
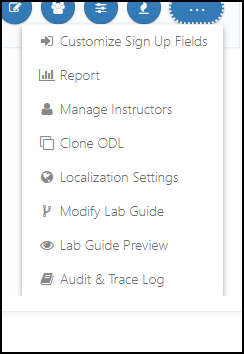
Clicking on the Create Lab Guide/Modify Lab Guide will open the Lab Guide Authoring through UI in a new tab.

3. Creating a new Lab Guide
3.1 Storage Methods:
Lab Guide Authoring through UI supports two Storage Methods:
- CloudLabs-Managed: Lab Guide will be stored within CloudLabs.
- Self-Managed: Lab Guide will be stored within the GitHub account and repository selected by you.

Prerequisite to use the Self-Managed storage method
To use the Self-Managed storage method, the CloudLabs Lab Guide GitHub app must be installed in the respective organization and repository.
To install the CloudLabs Lab Guide GitHub app in your GitHub organization, click on the link provided above the Organization Name dropdown as shown in the below screenshot (this is available while creating a new Lab Guide with Self-Managed storage method).
On clicking Install Lab Guide App you will be redirected to the below GitHub page in a new tab.

If you are not signed into a GitHub account, you must sign in using the button available in the top-right corner of the above page.
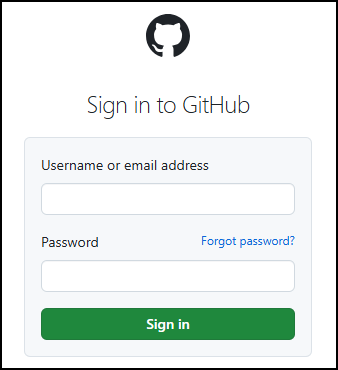
On clicking the Sign-in button, GitHub will redirect you to the below screen, where you need to provide GitHub credentials:
Once you are signed into GitHub, you will be redirected to the below page.
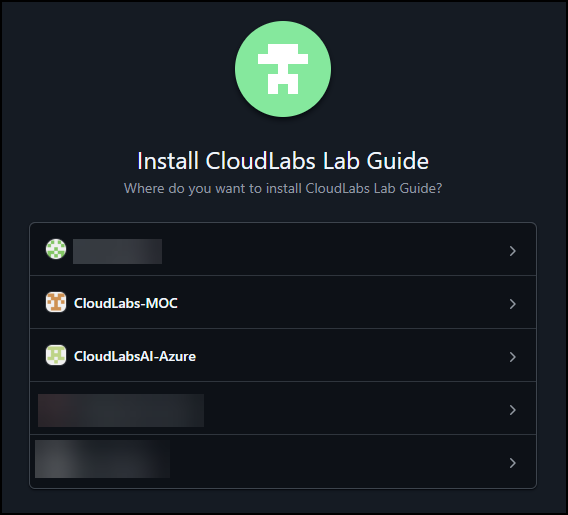
To continue, click on the Install button; GitHub will show the list of linked organizations in your GitHub account.
When you select one of the organizations, you will see the below page where you can provide access to:
All repositories: CloudLabs will be able to create/modify Lab Guide in all the repositories.
Only select repositories: CloudLabs will be able to create/modify Lab Guides only in chosen repositories.
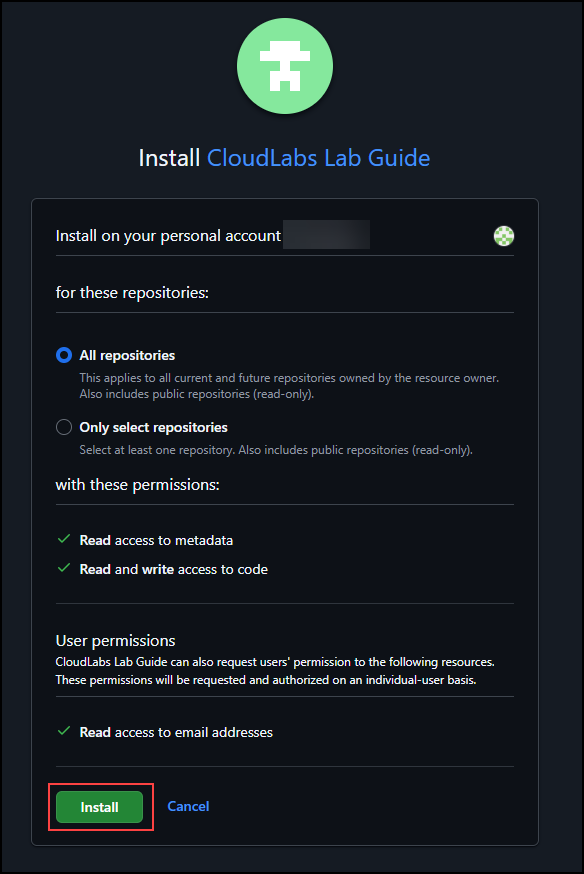
To continue, click on the Install button.
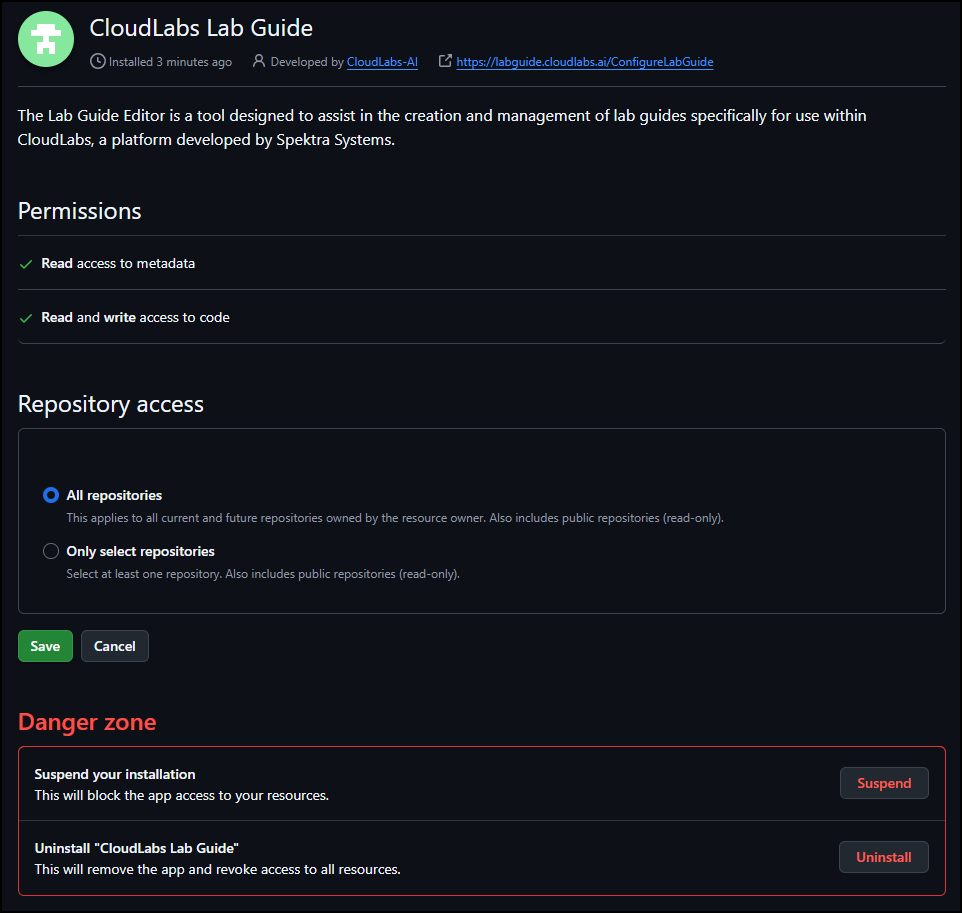
Once the CloudLabs Lab Guide GitHub app has been installed, you will be able to see it within the Applications tab under your GitHub account Settings menu.
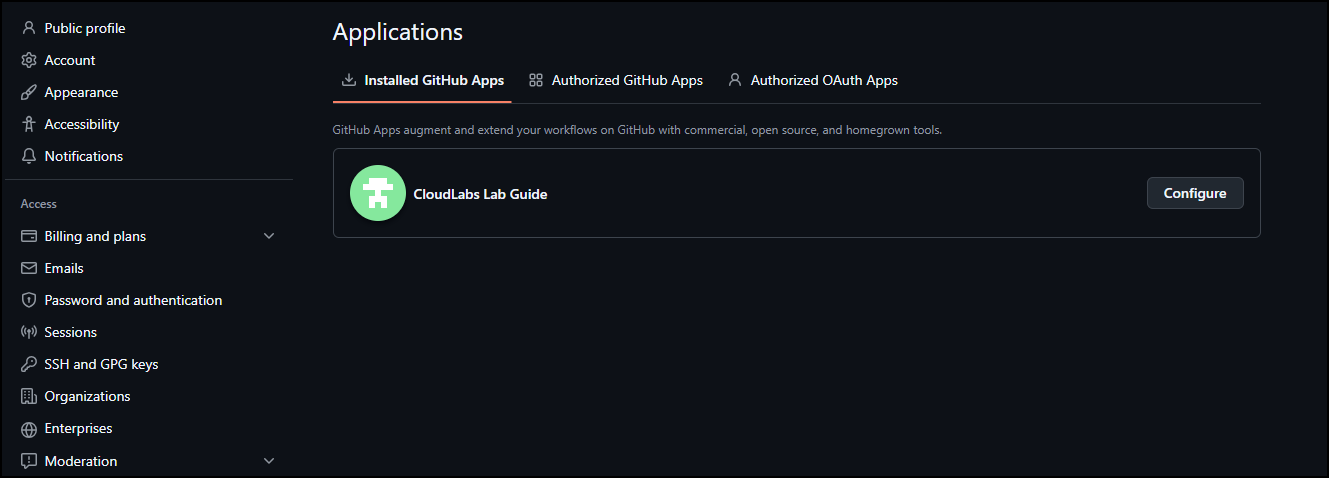
At any point in time, if you wish to revoke the access or modify the configuration, you can return to the above page using your GitHub profile and click on the Configure button.
Note:
- To install the CloudLabs Lab Guide app, you must have the administrator privileges on the selected organization.
- In case you do not have the administrator privileges, the request will be sent to the administrators, and you will be able to create/modify the Lab Guide only when the request has been approved by the administrators.
On selecting the Self-Managed storage method, CloudLabs will ask you to authenticate with your GitHub account, and you will see the below screen.
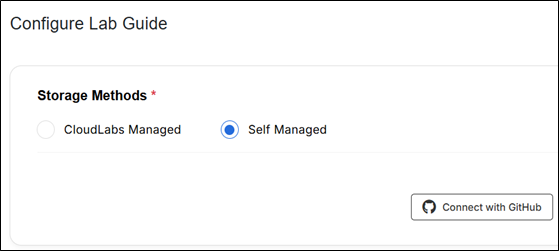
To authenticate with your GitHub account, click on the Connect with GitHub button and log in with your GitHub credentials.
Once authenticated, you will be redirected back to CloudLabs, and you will see the below page with your GitHub profile name and profile picture in the top-right corner.

3.2. Authoring Methods
- Lab Guide Authoring through UI supports three Authoring Methods:
Create a new Lab Guide: To create a new Lab Guide from scratch.
Customize Existing Lab Guide: To use an existing Lab Guide created/modified using CloudLabs and modify it as per requirements. Any changes made to the Lab Guide will also be reflected in all the existing ODLs/Templates using this Lab Guide.
Clone Lab Guide: To create a copy of an existing Lab Guide created/modified using CloudLabs and modify it as per requirements. Since Lab Guide is being cloned, any changes made to the cloned Lab Guide will only reflect in the currently selected ODL/Template.
Using Authoring Method: Create a new Lab Guide
When you select a storage method CloudLabs Managed and authoring method Create a new Lab Guide:
You will see the below screen with the Lab Guide Title prefilled with the title of the selected ODL/Template.
You can modify the Lab Guide title as per your needs.
Click Continue to proceed.

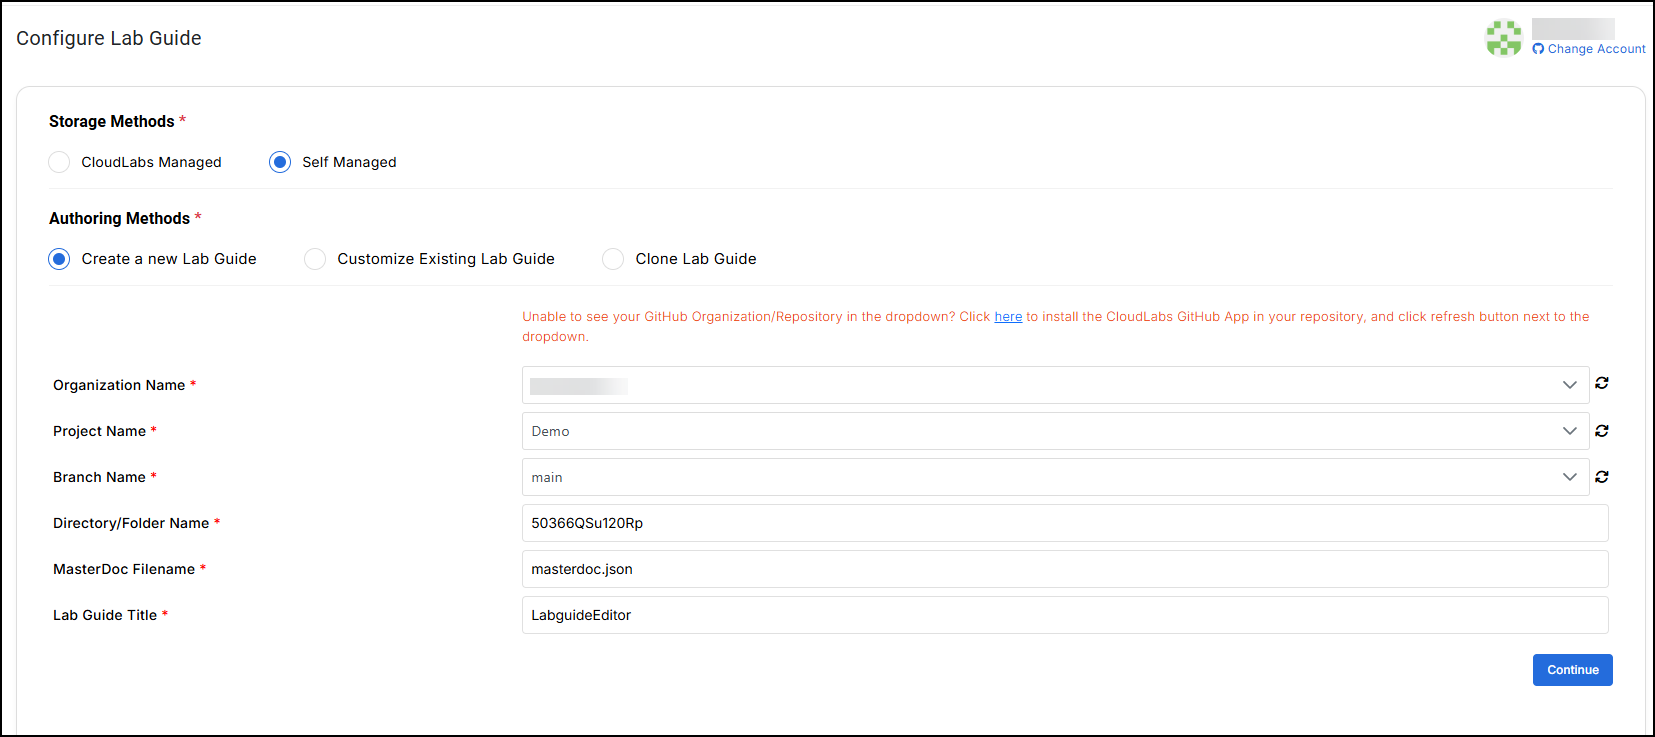
When you select a storage method Self-Managed and authoring method Create a new Lab Guide:
You will have to select Organization Name, Project Name, and Branch Name. (Data shown in these dropdowns will be fetched from your connected GitHub account).
Directory/Folder Name will be prefilled with a random string.
Master Doc Filename with prefilled as masterdoc.json.
Lab Guide Title will be prefilled with the title of the selected ODL/Template.
You can modify the above fields as per your needs.
Click on Continue to proceed.
Using Authoring Method: Customize Existing Lab Guide
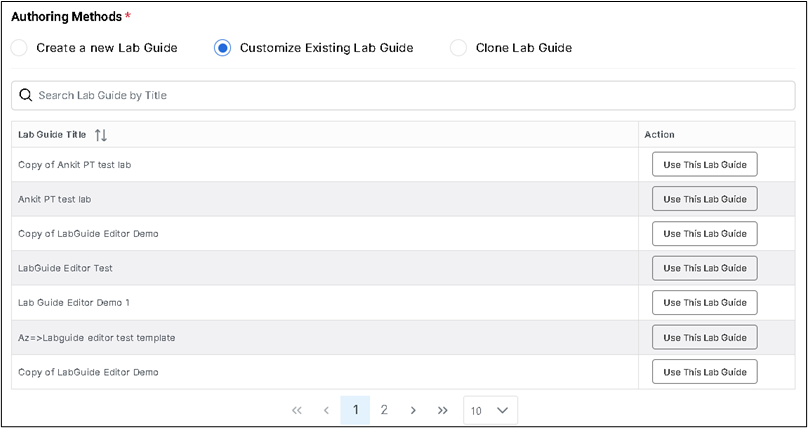
You will see a list of available Lab Guides present in the currently selected Storage Method and CloudLabs Tenant.
You can select any of the Lab Guides from the list by clicking on the Use this Lab Guide action button.
CloudLabs will load a list of available Lab Guide Pages as shown below, where you can make the required changes.
Any changes made to the Lab Guide will also be reflected in all the existing ODLs/Templates using this Lab Guide.

Using Authoring Method: Clone Lab Guide
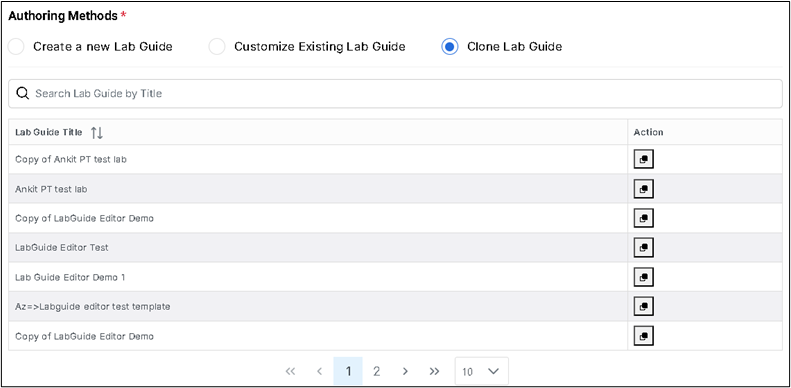
You will see a list of available Lab Guides present in the currently selected Storage Method and CloudLabs Tenant.
To continue, you can select any of the Lab Guide from the list by clicking on the action icon.
In case of CloudLabs-Managed storage method:
CloudLabs will show the below form with a prefilled Lab Guide Title.
You can customize the title as per your requirements and click the CLONE LAB GUIDE button.

- In case of a Self-Managed storage method:
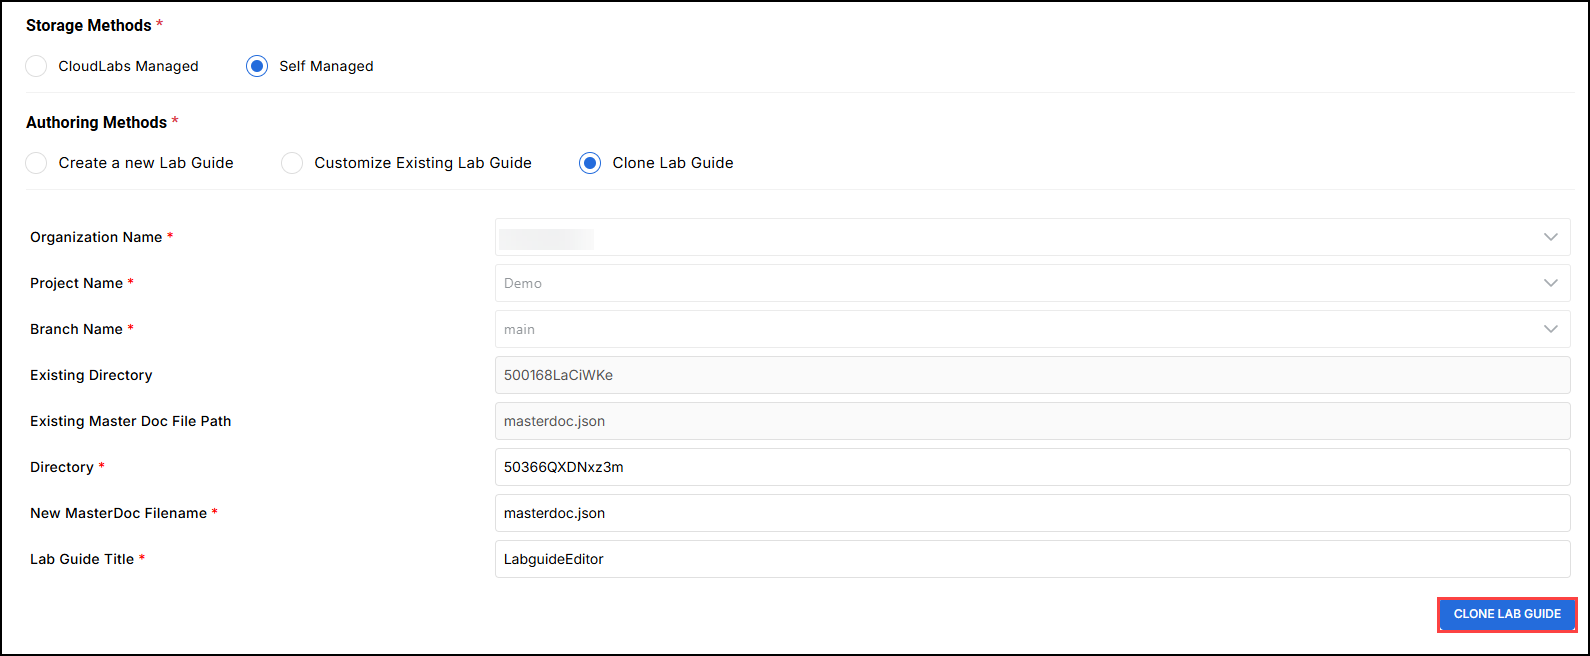
CloudLabs will show the below form with a prefilled Lab Guide Title.
You need to provide a new directory name (where the lab guide will be cloned) and a new master doc file name.
You can customize the title as per your requirements and click the CLONE LAB GUIDE button.
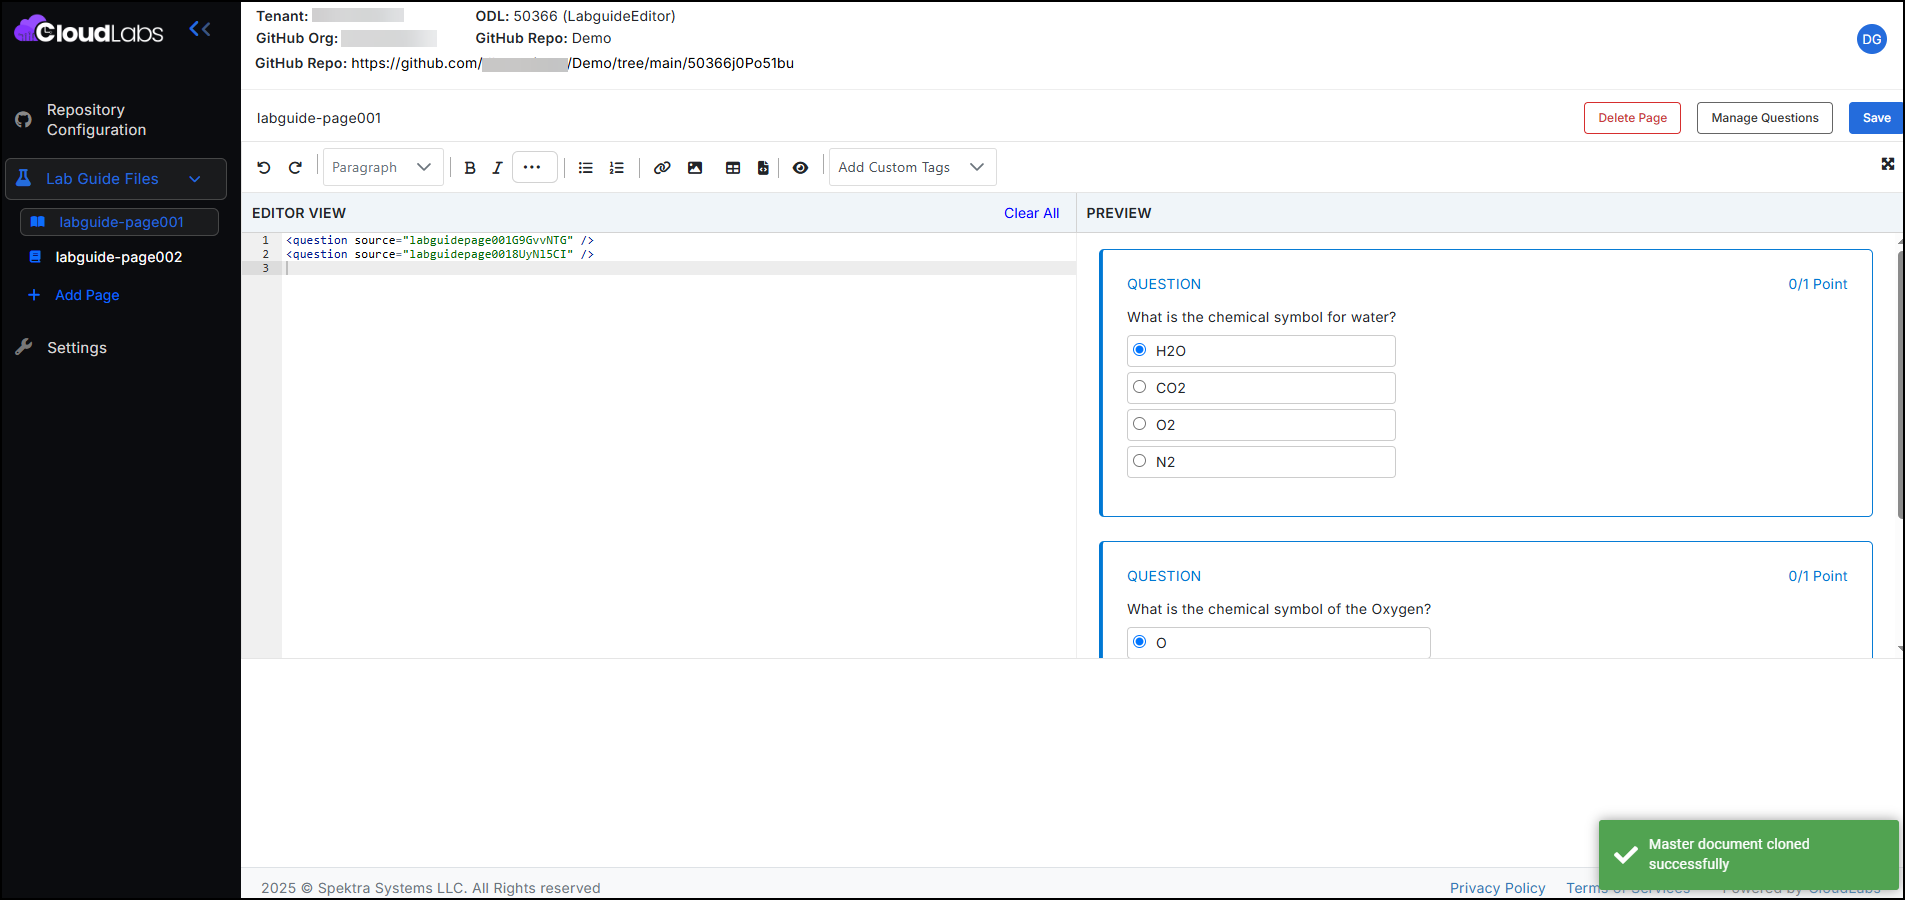
When you click on the CLONE LAB GUIDE button, CloudLabs will clone the Lab Guide and load the list of available Lab Guide Pages as shown below, where you can make the required changes.
4. Modifying a Lab Guide
There are few prerequisites to modify a Lab Guide using CloudLabs:
It must be created within a GitHub repository.
When Lab Guide exists with Self-Managed storage, you will have to authenticate the respective GitHub account with CloudLabs and install the CloudLabs Lab Guide GitHub app in the respective GitHub organization.
When Lab Guide exists within the CloudLabs-Managed storage, you will be able to see the existing pages without any additional steps.
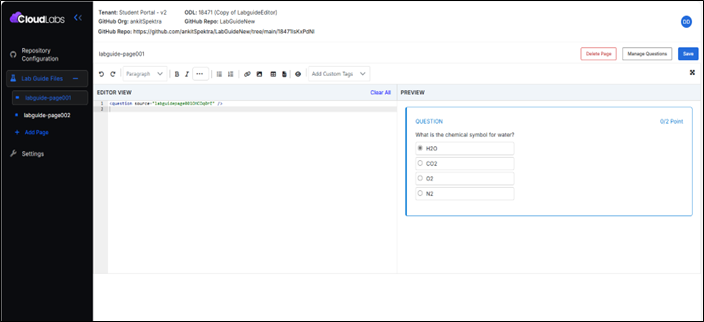
CloudLabs will load a list of available Lab Guide Pages as below, where you can make the required changes.
5. Adding a Lab Guide Page
To add a new Lab Guide Page, click on the + Add Page in the sidebar under the Lab Guide Files menu.

Note: This is a initial release (preview). If you encounter issues while saving the guide content, it might be due to the presence of special characters that are not currently supported. To resolve this, please remove any special characters and try saving again. We are continuously working to enhance compatibility and expand character support.
When a new Lab Guide page is added, CloudLabs will assign a default name. To rename the page, click Edit (pencil icon) as shown below. Renaming is not allowed after the page is saved.
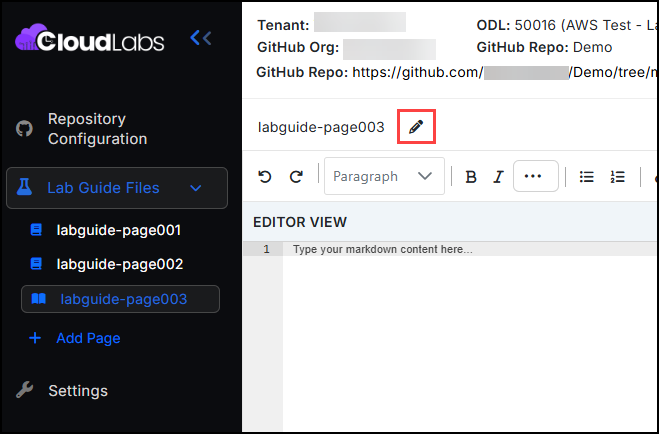
The Lab Guide page screen is divided into the below sections:
- Editor Panel: Here you will write the Lab Guide content in markdown syntax.
- Preview Panel: Here you can preview the Lab Guide content in HTML form.
To create a lab guide, basic knowledge of markdown syntax is helpful.
In case you are not aware of the markdown syntax, you can use the below toolbar buttons:

To maximize the editor and preview section, click on the maximize icon from the top-right corner.
6. Adding Custom Tags in Lab Guide
- The toolbar also has a dropdown to add the following Custom Tags:
- Inline Questions: To add inline single-choice/multiple-choice/feedback questions in the Lab Guide.
- Inline Validations: To add inline validations in the Lab Guide.
- Inline Videos: To add a YouTube or video in the Lab Guide.
- Inject Keys: To add some static data or dynamic lab information in the Lab Guide.
- Clicking on a custom tag item in the dropdown, the respective dialog box will be opened from where you select one of the items to add an Inline Question/Inline Validation or provide the required details to add an Inline Video/Inject Key.
6.1. Adding Inline Questions in Lab Guide
Before adding an Inline Queston, we need to register the questions on the respective Lab Guide page.
Click on the Manage Questions button to add/modify the questions for the current page.
On selecting the Questions item in the Custom Tags dropdown, questions registered on the page will be loaded in the below dialog box:
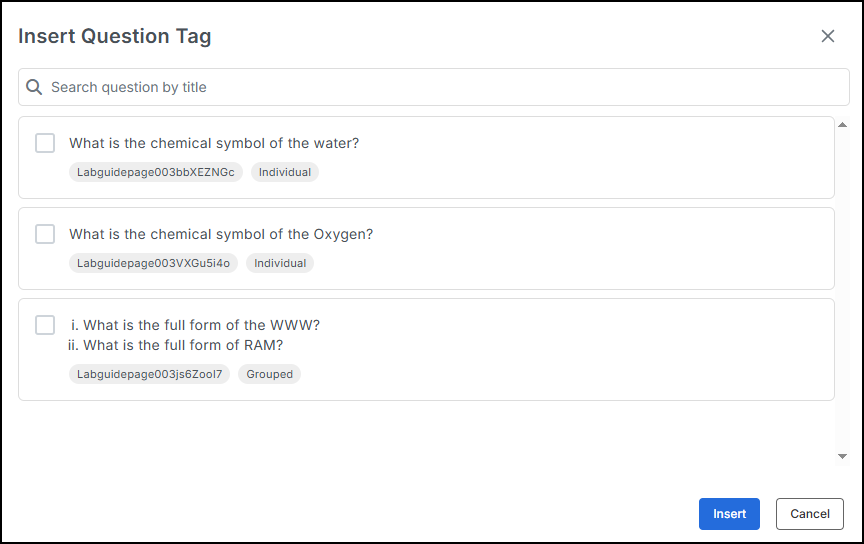
Once questions have been added, you will see
or tag in the editor panel and Inline Question component being rendered in the preview panel: 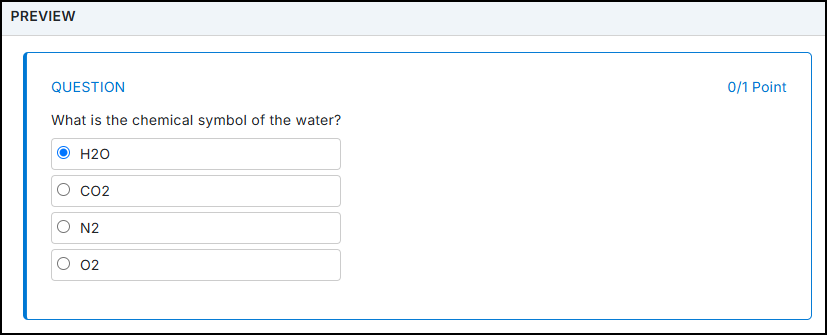
6.2. Adding Inline Validations in Lab Guide
Before adding an Inline Validations, you will need to register the validations in the respective template using the CloudLabs Admin portal.
On selecting the Validations item in Custom Tags dropdown, validations registered in the template will be loaded in the below dialog box.
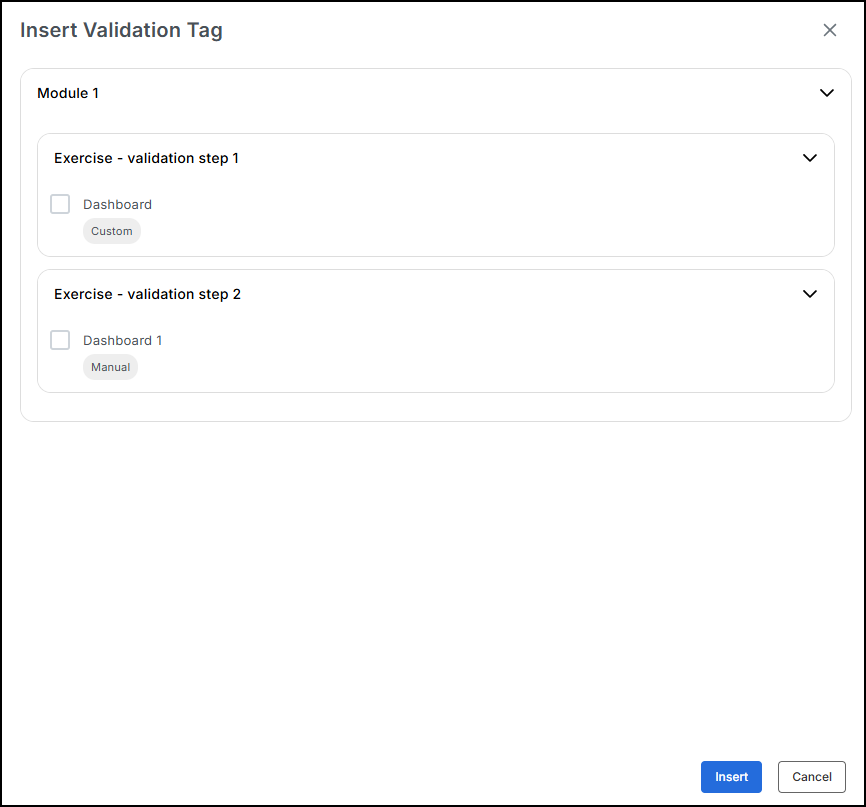
Once Validations have been added, you will see a
tag in the editor panel and an Inline Validation component rendered in the preview panel.
6.3. Adding Inline Videos in Lab Guide
On selecting the Videos item in the Custom Tags dropdown, the below dialog box will be opened, where you need to provide the video URL and custom height and width (optional).
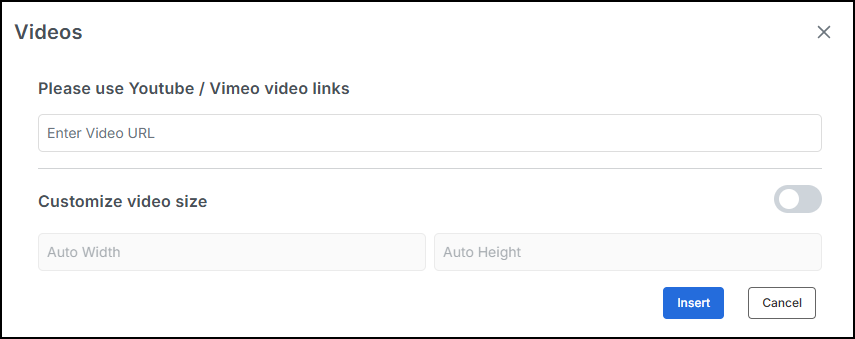
Click on the Insert button in the dialog box;
a tag will be added in the editor panel, and the video will be rendered in the preview panel: 
6.4. Adding Inject Key Tags in Lab Guide
- On selecting the Inject Key item in the Custom Tags dropdown, the below dialog box will be opened, where you need to provide the inject key and values along with other attributes:
Cloud Name: To specify the Cloud Friendly name for the inject key, required for Multi CloudLabs.
Inject Attributes: There are three types of attributes:
Key: A key is replaced with deployment output parameters when the lab is deployed for an attendee. You can select one of the keys from the Value dropdown or input manually.
Value: A value is a static attribute that renders the static content placed in the Value field.
Default Value: When CloudLabs is not able to find the value for a key in deployment output parameters, the Default Value is rendered in the attendee view.
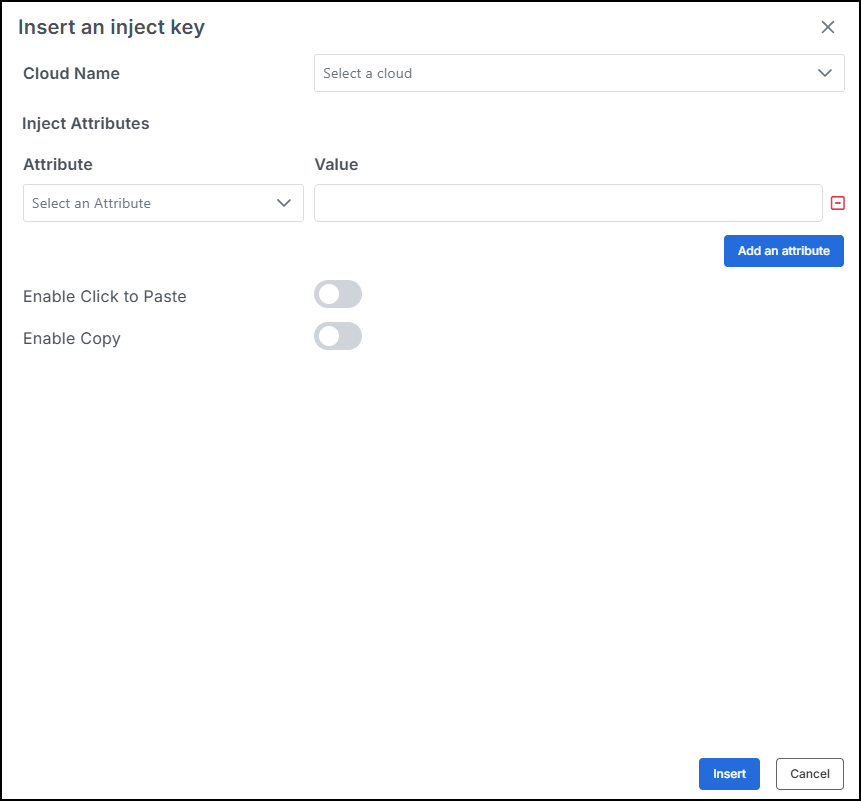
Click on the Insert button in the dialog box,
a tag will be added in the editor panel, and the Inject key will be rendered in the preview panel:
7. Manage Lab Guide Page Questions:
- CloudLabs supports two types of question tags: Individual Questions and Grouped Questions.
- Individual Questions: To show single choice/multiple choice/feedback questions in each tag.
- Group Questions: To show one or more questions in a single tag.
To manage current page questions, click on the Manage questions button on any Lab Guide page.
Manage Questions will display the existing Individual Questions and Grouped Questions in a list view.
7.1. How to Create or Edit Individual Questions
Click on the Individual Questions tab; CloudLabs will display existing questions in a list view.

The Delete button in list view will mark the selected question as Deleted.
The Edit button in list view will load the selected question on the Edit Individual Question page.
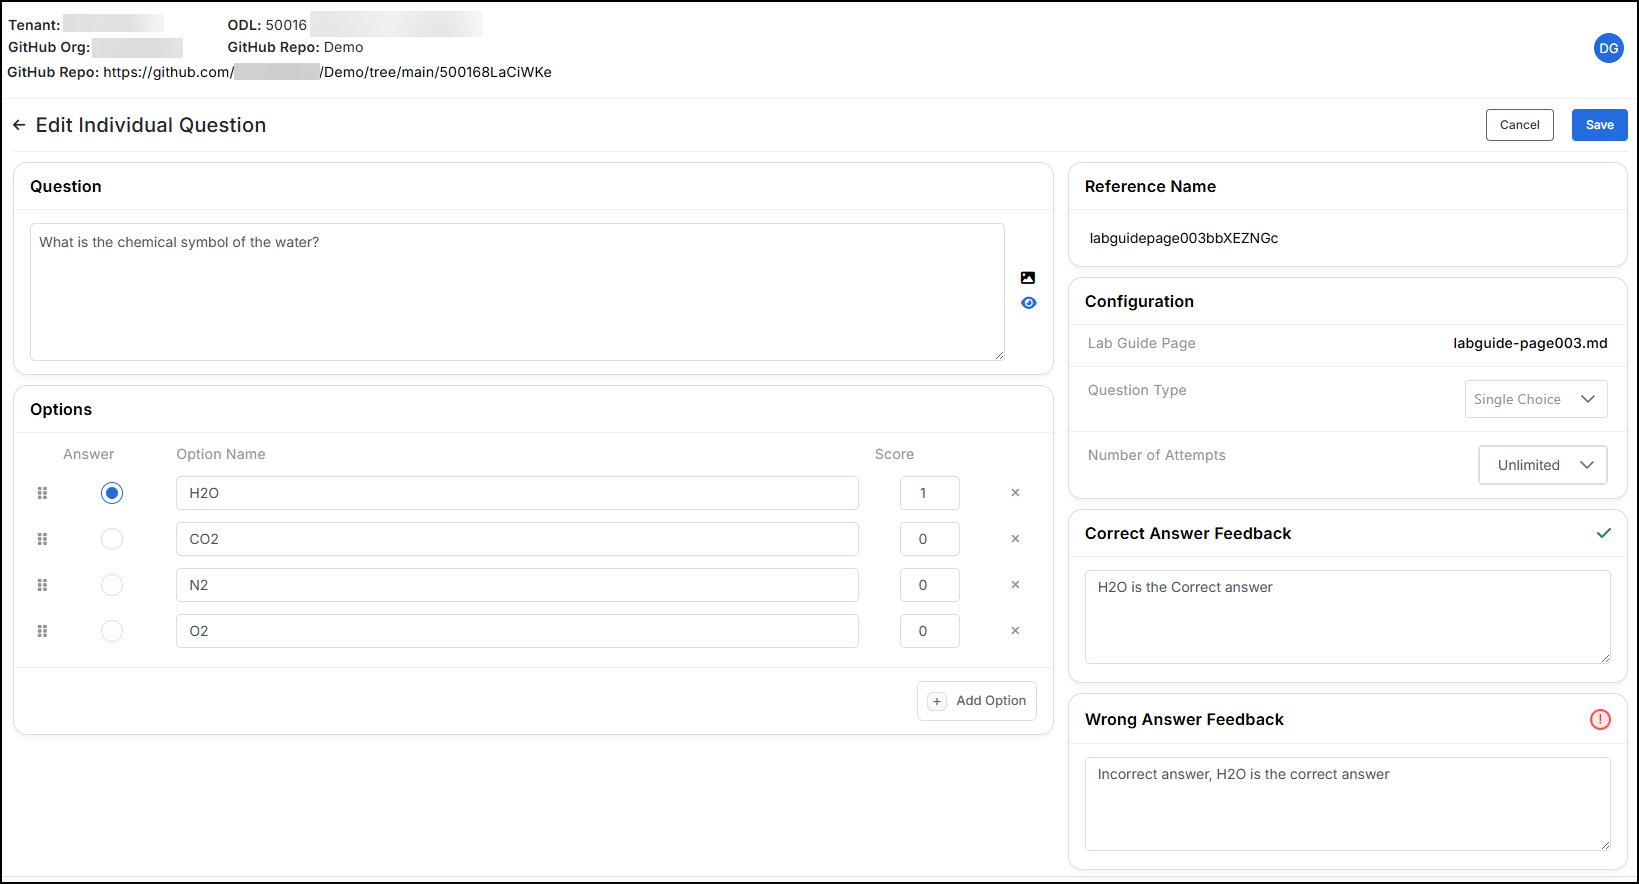
The Create Question button on the Individual Questions tab will open the Create Individual Question page.
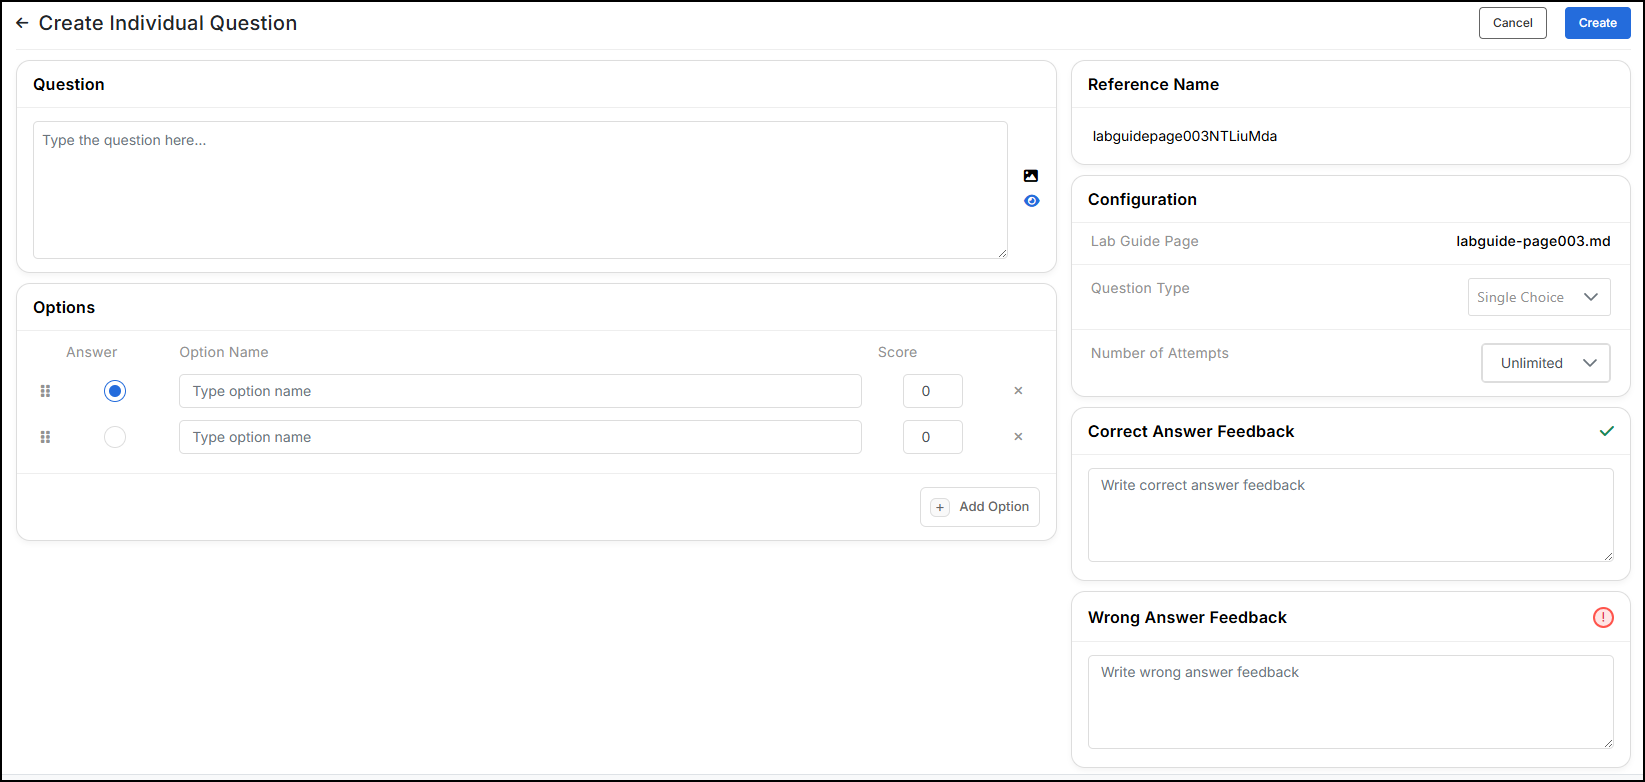
7.2. How to Manage Grouped Questions
Click on the Group Questions tab; CloudLabs will display existing questions in the Manage Questions list view.

Clicking on the Edit button in the Group Questions list view will load the selected group question on the Edit Group Questions page.

Clicking on the Create Question button on the Group Questions tab will open the Create Group Question page.

7.3. How to Create or Edit Questions inside a Group Question
Clicking on the Delete button in the Edit Group Questions list view will mark the selected question as Deleted.
Clicking on the Add Question button in above list view will open the Create Question page.
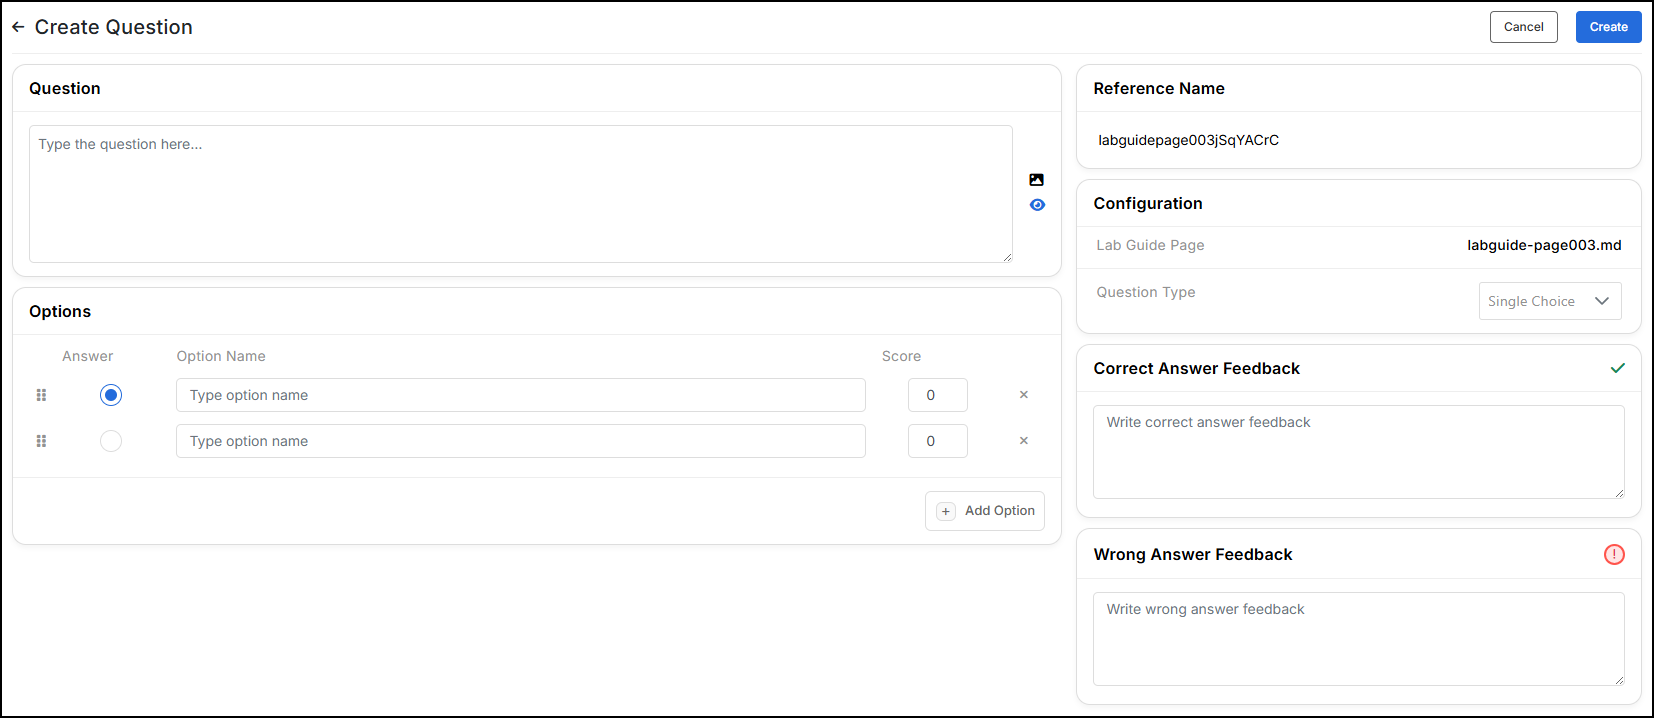
Clicking on the Edit button in the Edit Group Questions list view will load the selected question on the Edit Question page.
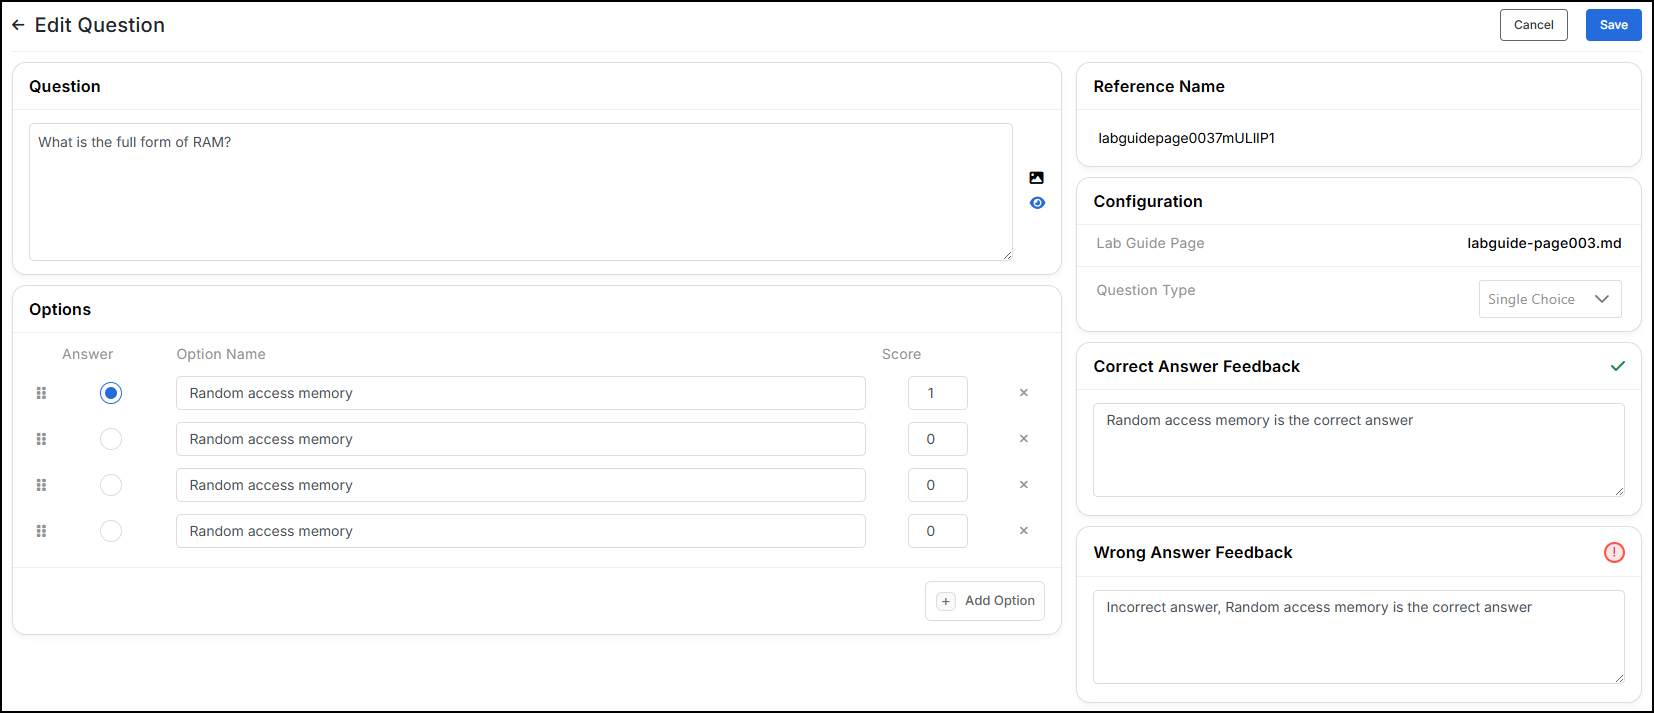
Please note that after adding or updating the content, you must publish it from the Lab Guide settings to apply the changes in the lab. For more details, proceed to the next section.
8. Manage Lab Guide Settings and Publish the Lab Guide
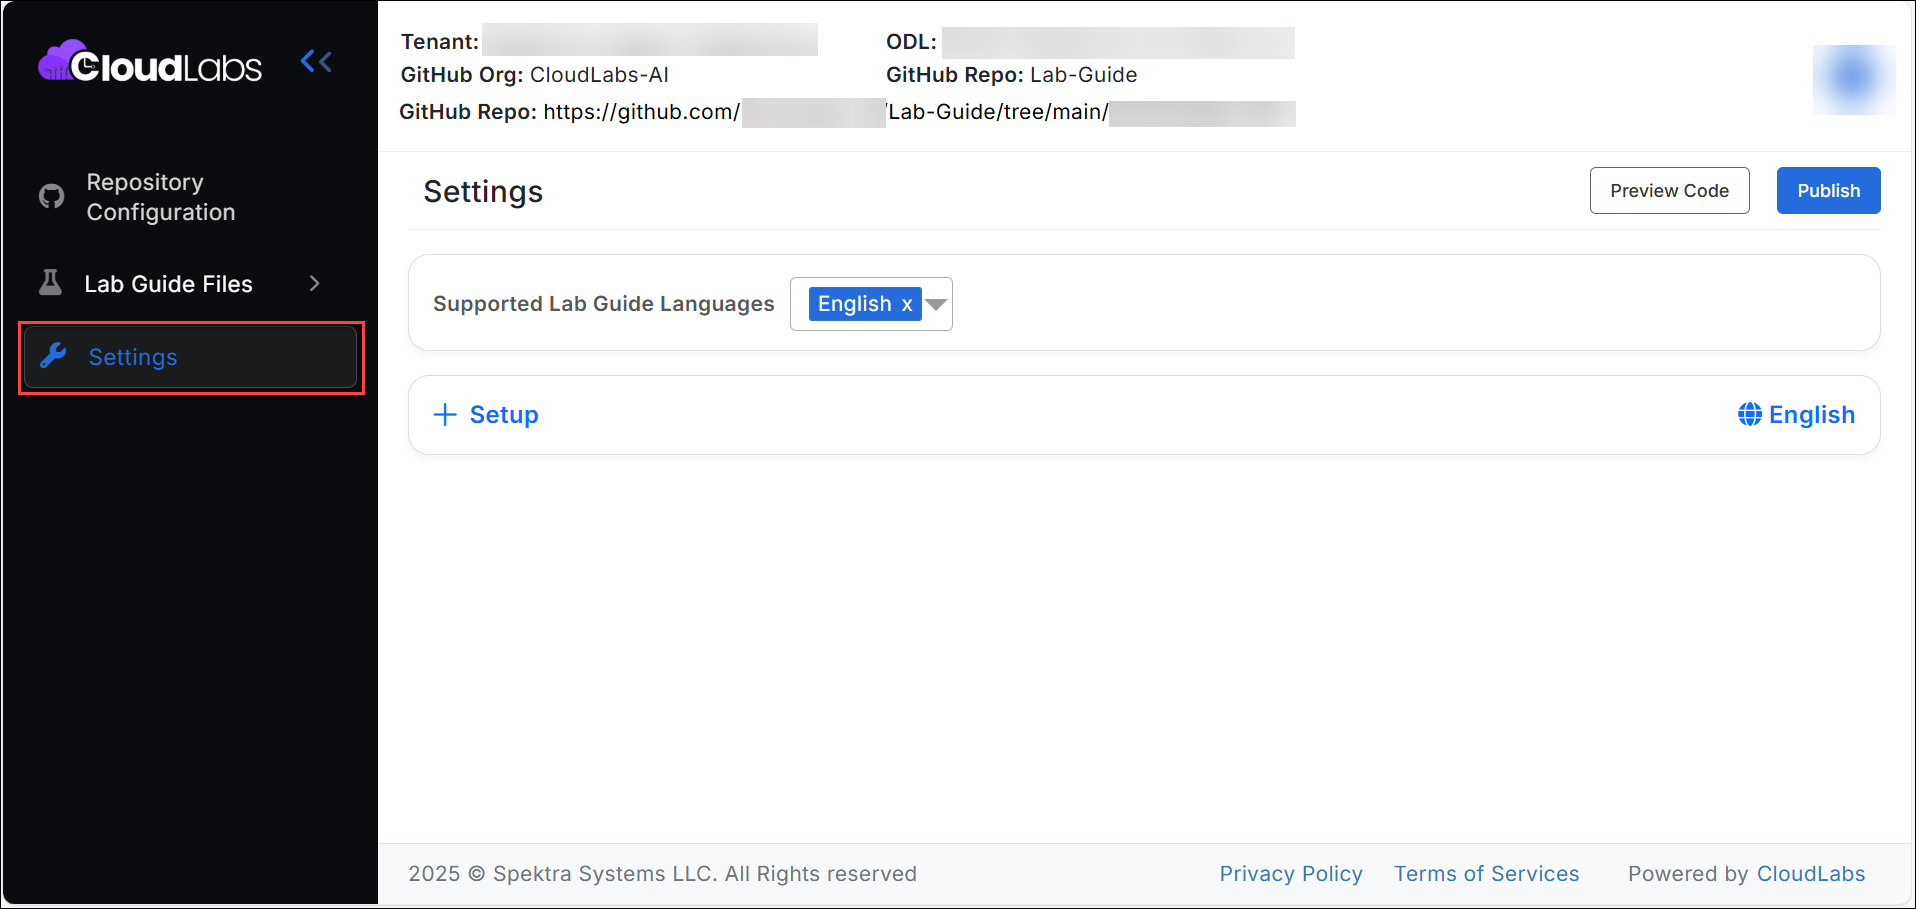
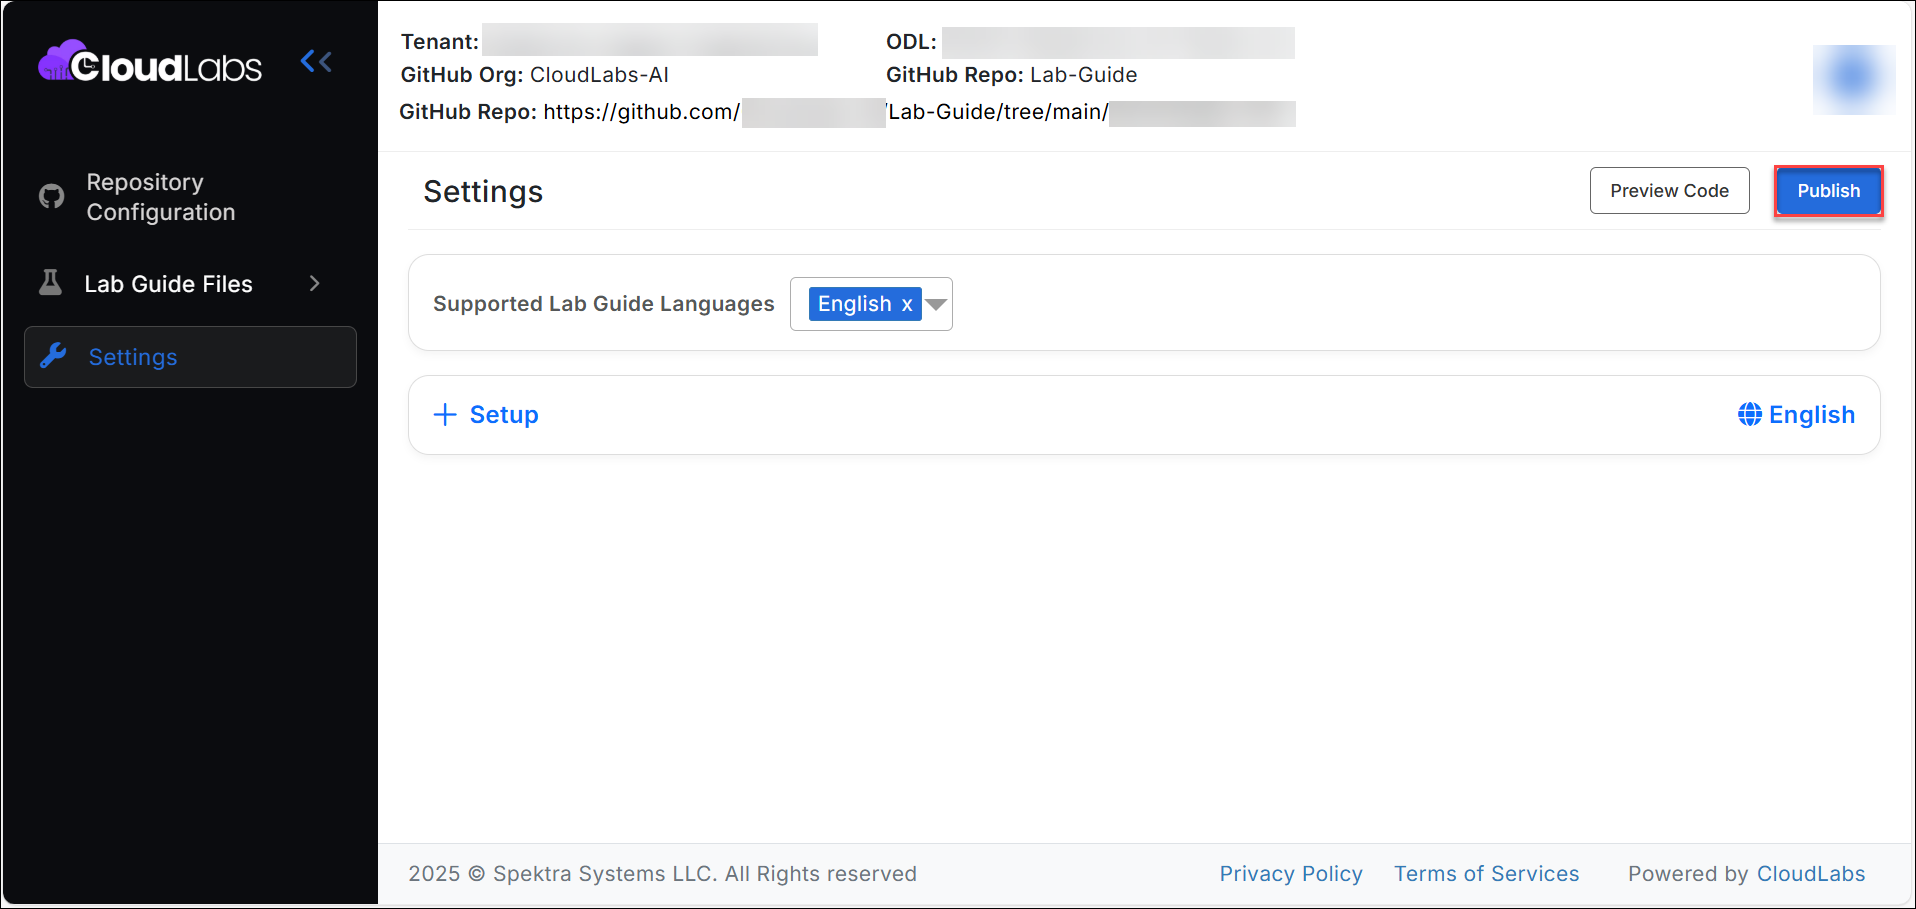
Lab settings page helps to customize pages within the Lab Guide. Please click on Settings to get started:

Lab Guide Languages: You can add multiple languages in a single Lab Guide. To select different pages in each Lab Guide language, disable the unwanted pages in each language using the toggle button.
Page Order: You can change the sequence of the pages in the Lab Guide using up and down arrows.
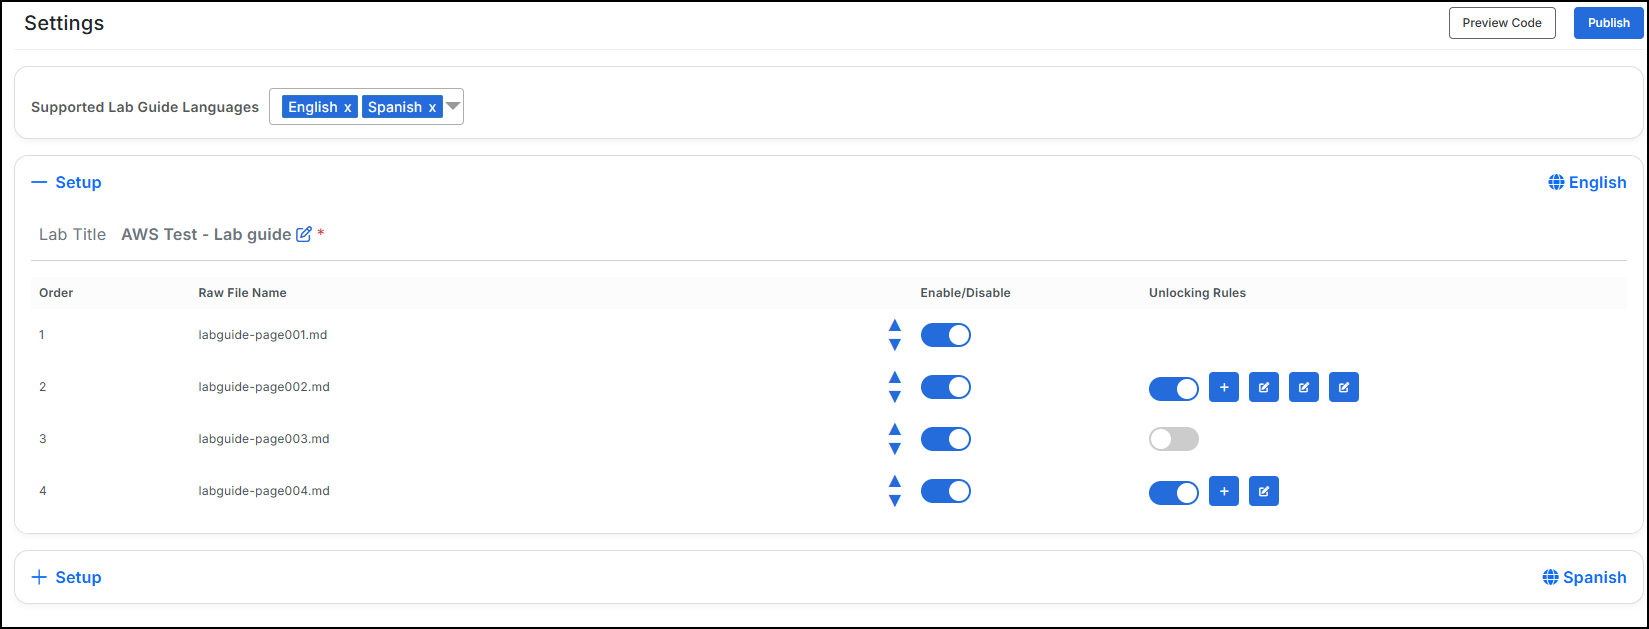
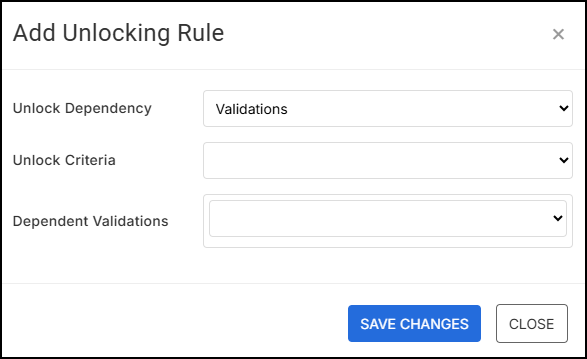
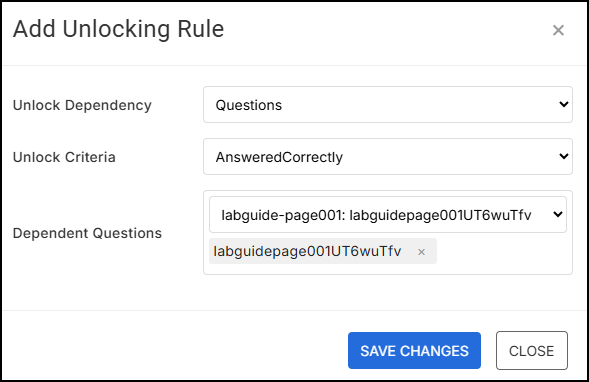
Unlocking Rules: Access to Lab Guide pages can be restricted by adding unlocking rules on each page:
Validation Unlocking Rule: You can select the Validation Steps that should be passed to unlock a particular page. It supports following unlocking criteria to control the Lab Guide page access:
- Completed: Selected Validation Steps must be completed to access the Lab Guide page.
- Completion Percentage: Selected Validation Steps must satisfy the configured Completion Percentage.
Question Unlocking Rule: You can select the Questions that should be passed to unlock a particular page. It supports following unlocking criteria to control the Lab Guide page access:
Answered: Selected Questions must be answered to access the Lab Guide page.
Answered Correctly: Selected Questions must be answered with the correct answer to access the Lab Guide page.
Score: Answers submitted for Selected Questions must satisfy the configured Score.
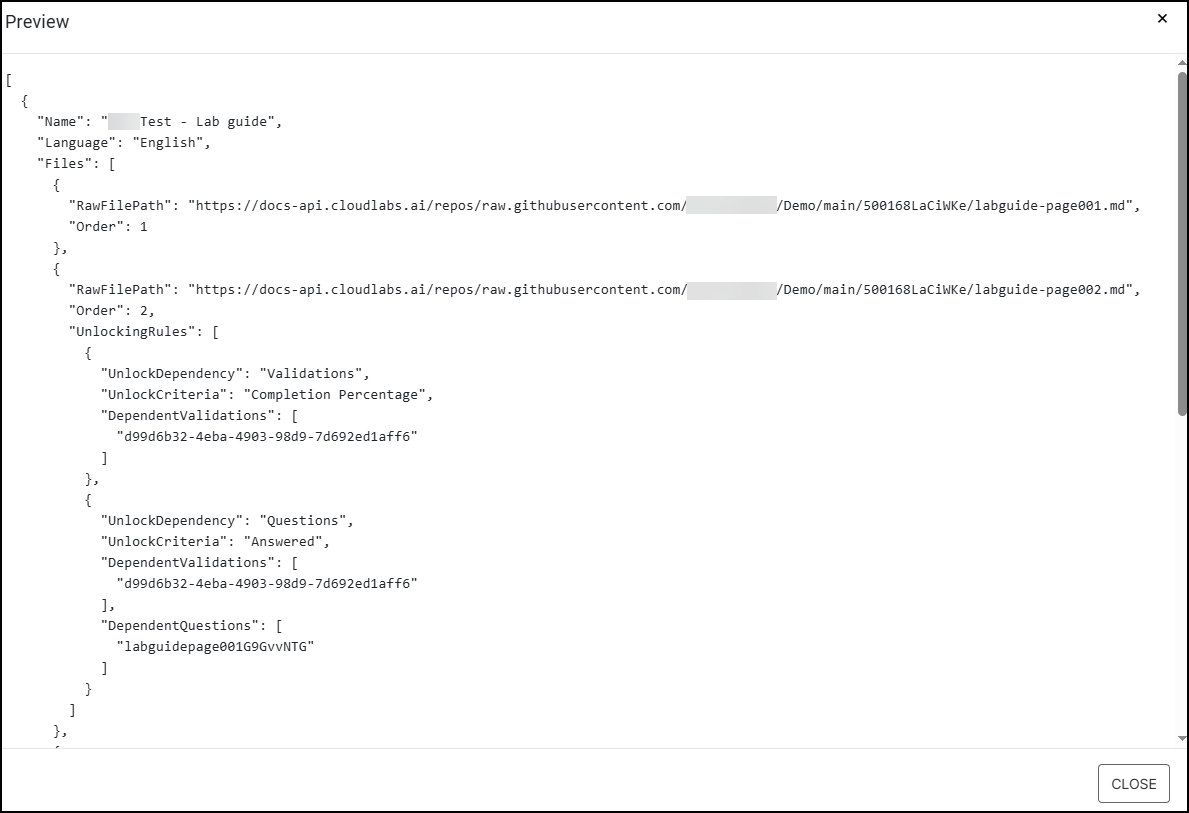
Preview Code: Using this button, users who are familiar with Lab Guide master doc format can preview the settings.
Publish the Lab Guide
Using this button, the changes made on the Settings page will be saved and will reflect in Attendee View.

In summary, the Lab Guide Authoring through UI makes it easy to create and update lab guides for CloudLabs. It works with both CloudLabs and GitHub for storing your guides, and you can create, change, or copy guides as needed. The app also offers simple tools to add pages, questions, videos, and rules to guide users through the labs.