Authoring Lab Guides
Overview
You can now directly embed Git markdown documents into the CloudLabs platform using its easy-to-use self-service capabilities. In this documentation, we will explore some of the best practices for making lab guide documentation using Git markdown and how to structure it most effectively.
About Git Markdown
Markdown is a way to style text on the web. You control the display of the document; format words as bold or italics; add images and screenshots; and how to create lists. These are just a few of the things we can do with Markdown. Mostly, Markdown is just regular text with a few non-alphabetic characters thrown in, like # or *. Please go through this documentation if you need to get familiar with Git Markdown.
Mastering Markdown · GitHub Guides
Structuring: Folder/Files
The first thing you would want to do before you start writing lab guides is structure the content. Meaning, you need to segregate the content into a structure that maintains a logical flow and is also easy to navigate. It also helps to keep things organized for later editing.
Let us take a scenario to understand this. You are trying to create two modules: Module 1- Data and Module 2- AI. Now let's say each of them has 2 exercises. You can structure them as follows in the repository:
Folder - As you can see in the above folder structure, the instructions for each module are included within a folder for better classification.
File - It is a best practice to include each exercise as different file. The benefit of doing this in CloudLabs is that each exercise gets shown as an individual page on the platform, providing an easy navigation panel for learners.
Images - In this folder, which is under the Instructions folder, you can store all the screenshot images. The naming convention for the images can be followed as given here if you have modules.
For example, m2-ex2-st-20-vmcreate.png - name will indicate that this image is from Module 2 -> Exercise 2 -> Step -> 20 -> Action being performed.
Structuring: Lab Guides
Right after you are done structuring the folder and files, you are ready to start with the actual documentation part. However, before you begin, there are some best practices that will help you maintain efficiency.
- It is recommended to have the first page as an overview of the technology that they are going to learn as part of the lab.
Refer to this document: https://github.com/CloudLabsAI-Azure/AVW-Arc-enabled-dataservices/blob/aiw-arc/Instructions/README.md
Here the documentation is on Azure Arc, and as you can see, there is an introduction to Azure Arc followed by what the workshop is going to cover. Finally, we talk about it in the context of the lab.
A good overview helps the labs stand out and set the context right. It is the first file an attendee will see when they start with the lab, so it should be fairly written and well-structured, so as the other files
- The second page typically contains information about the pre-provisioned environment in the labs and is followed by more instructions on how to access it. Then an overview of the pre-provisioned resources and where they will need them.
Here is a sample you can refer to: https://github.com/CloudLabsAI-Azure/AVW-Arc-enabled-dataservices/blob/aiw-arc/Instructions/HOL%201/01-Getting-Started-with-Azure-Arc.md
- In the subsequent pages, you can provide the actual exercises.
The purpose of any instructional documentation is to determine how effective it is for the readers. It is very important to write instructional guides that are easy to understand and follow, even if the reader has no prior knowledge of the subject.
Best Practices:
Here are some of the best practices that you should keep in mind while developing the content. We will be presenting some examples with the Incorrect Method followed by the Correct Method for better understanding.
Writing Tips
- There shouldn't be multiple actions defined in a single step. Always make it a habit to split the steps to ensure that each step is easy to understand.
Example:
Incorrect Method:

Correct Method

- There should not be any undefined headings after which the numbering restarts.
Example:
Incorrect Method:
Task 1: Step 1 Step 2
Heading
   Step 1
   Step 2
Correct Method:
Task 1: Step 1 Step 2
Task 1.1: Heading
   Step 1
   Step 2
There should be a good overview section at the beginning and a summary of each exercise.
The wait times after a step should be called out clearly. There should not be any ambiguous statements.
Example:
Incorrect: This step will take some time to get completed. Correct: This step will take around 5 minutes to complete. In the meantime, you can go through this document.
The entire document should be verified by Grammarly to ensure there are no unnoticed grammar errors or incorrect spelling.
If you are providing information, do not add it as a step; instead, keep it as a note or info.
Additional Tips
If screenshots cannot clearly explain the actions to be performed, it is recommended to use GIFs.
Instead of using UniqueID, we should use inject keys for the deployment wherever possible.
The values that attendees have to copy from the lab guide should be given in a key-value format, and the key should have an exact name as in the portal or the UI they see.
Additional information or links can be added for attendees' reference.
If RDP over HTTPS with Jump VM is provided, the lab guide should be written with RDP over HTTPs experience. If the lab can be performed from the browser, do not perform the lab from within your local browser and prepare the documentation, as the experience might vary in the two scenarios.
Samples
Here are a few samples to help you understand better.
Example Guide: https://github.com/CloudLabsAI-Azure/AVW-Arc-enabled-dataservices/blob/aiw-arc/Instructions/02.md
Format Guide: https://github.com/PraveenAnil/sample/blob/main/Instructions/01.md
More Samples: https://github.com/CloudLabsAI-Azure
Injecting Personalized Information into a Guide
Using the inject key property, you can insert dynamic information in the Lab Guide itself, such as an Azure username and password.
Below are the natively supported inject keys:
<inject key="AzureAdUserEmail"></inject>
<inject key="AzureAdUserPassword"></inject>
<inject key="DeploymentID"></inject>
<inject key="ApplicationID"></inject>
<inject key="DisplayName"></inject>
<inject key="SecretKey"></inject>
<inject key="SubscriptionID"></inject>
<inject key="TenantID"></inject>
<inject key="TenantDomainName"></inject>
You can close inject key code snippet in two ways:
i) <inject key="AzureAdUserEmail"></inject>
ii) <inject key="AzureAdUserEmail"/>

Inject key also supports additional parameters:
i) color: Using color parameter, you can add color to injected value.
ex:
   <inject key="AzureAdUserEmail" style="color:red" />

Other supported colors are indianRed, blue, lightCoral, green.

ii) enableCopy: Setting the enableCopy parameter to "true" will provide you a copy icon next to the injected text from which you can copy the value. In contrast, setting it to "false" will disable the copy icon.
ex:
   <inject key="AzureAdUserEmail" enableCopy="true" />
Sample Guide
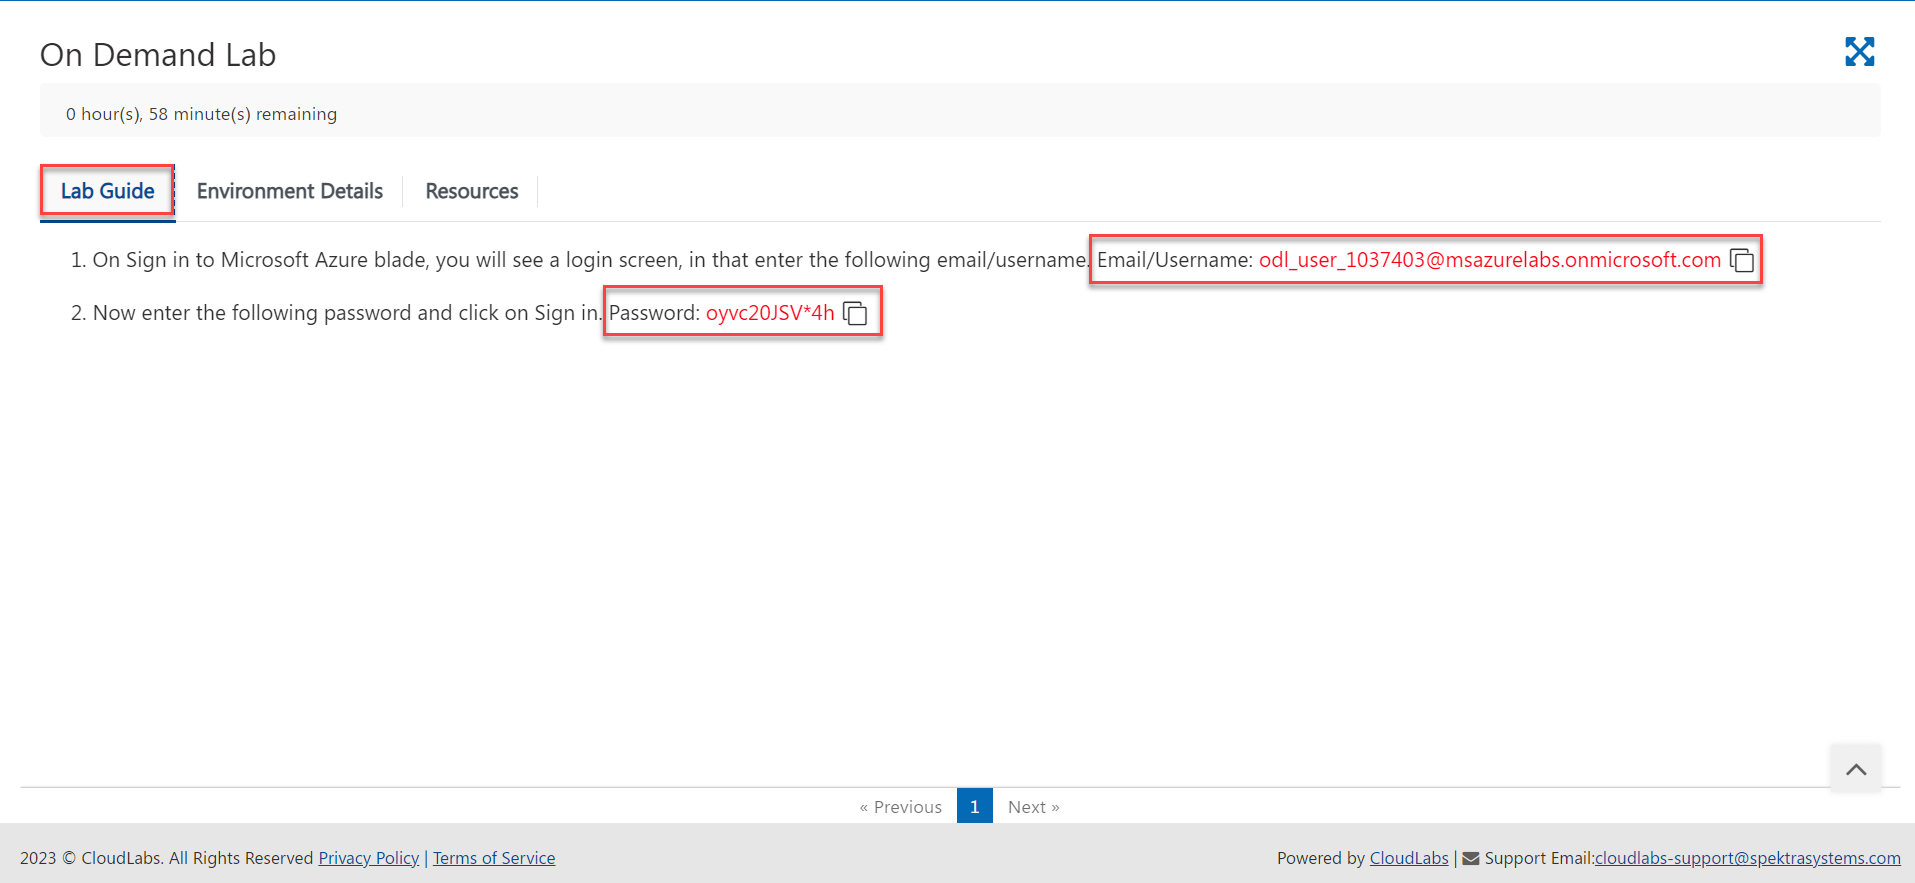
1. On Sign in to Microsoft Azure blade, you will see a login screen. In that screen, enter the following email/username.
   Email/Username: <inject key="AzureAdUserEmail" enableCopy="true" style="color:blue"></inject>

2. Now enter the following password and click on Sign in.
   Password: <inject key="AzureAdUserPassword" enableCopy="true" style="color:blue"></inject>

Inject environment outputs:
Additionally, you can inject the values from ARM template outputs, such as Azure resource names, VM username and password, etc., into the lab guide.
>Example:
Below is the outputs section of the ARM template:
"outputs": {
    "VM Name": {
      "type": "string",
      "value": "[variables('VmName')]"
    },
    "VM Admin Username": {
      "type": "string",
      "value": "[parameters('VmUsername')]"
    },
    "VM Admin Password": {
      "type": "string",
      "value": "[parameters('VMPassword')]"
    },
    "VM DNS Name": {
      "type": "string",
      "value": "[reference(resourceId('Microsoft.Network/publicIPAddresses',variables('publicIpAddressName'))).dnsSettings.fqdn]"
    }
  }
Sample Guide
1. Once logged into the Microsoft Azure portal, search for and select the Virtual Machine resource. In the VM list, select the VM <inject key="VM Name"/>.

2. Download the RDP file and open it so that you can connect to the VM.

3. In the Remote Desktop Connection, provide the VM DNS name <inject key="VM DNS Name" enableCopy="true"/> and click Connect.

4. In the following "Enter Your Credential" screen, provide VM username <inject key="VM Admin Username" enableCopy="true" style="color:blue" /> and password <inject key="VM Admin Password" enableCopy="true" style="color:blue" /> and select OK followed by Yes in the next page, which will then log you into the VM.
After rendering the above Sample Guide, the users will see the actual values from the ARM template outputs.
Github Master Document:
This is a JSON-formatted document that is used to arrange the lab guide in a coherent way. We should first prepare the document in JSON format, with section-by-section raw GitHub URLs, as it only supports GitHub raw URLs.
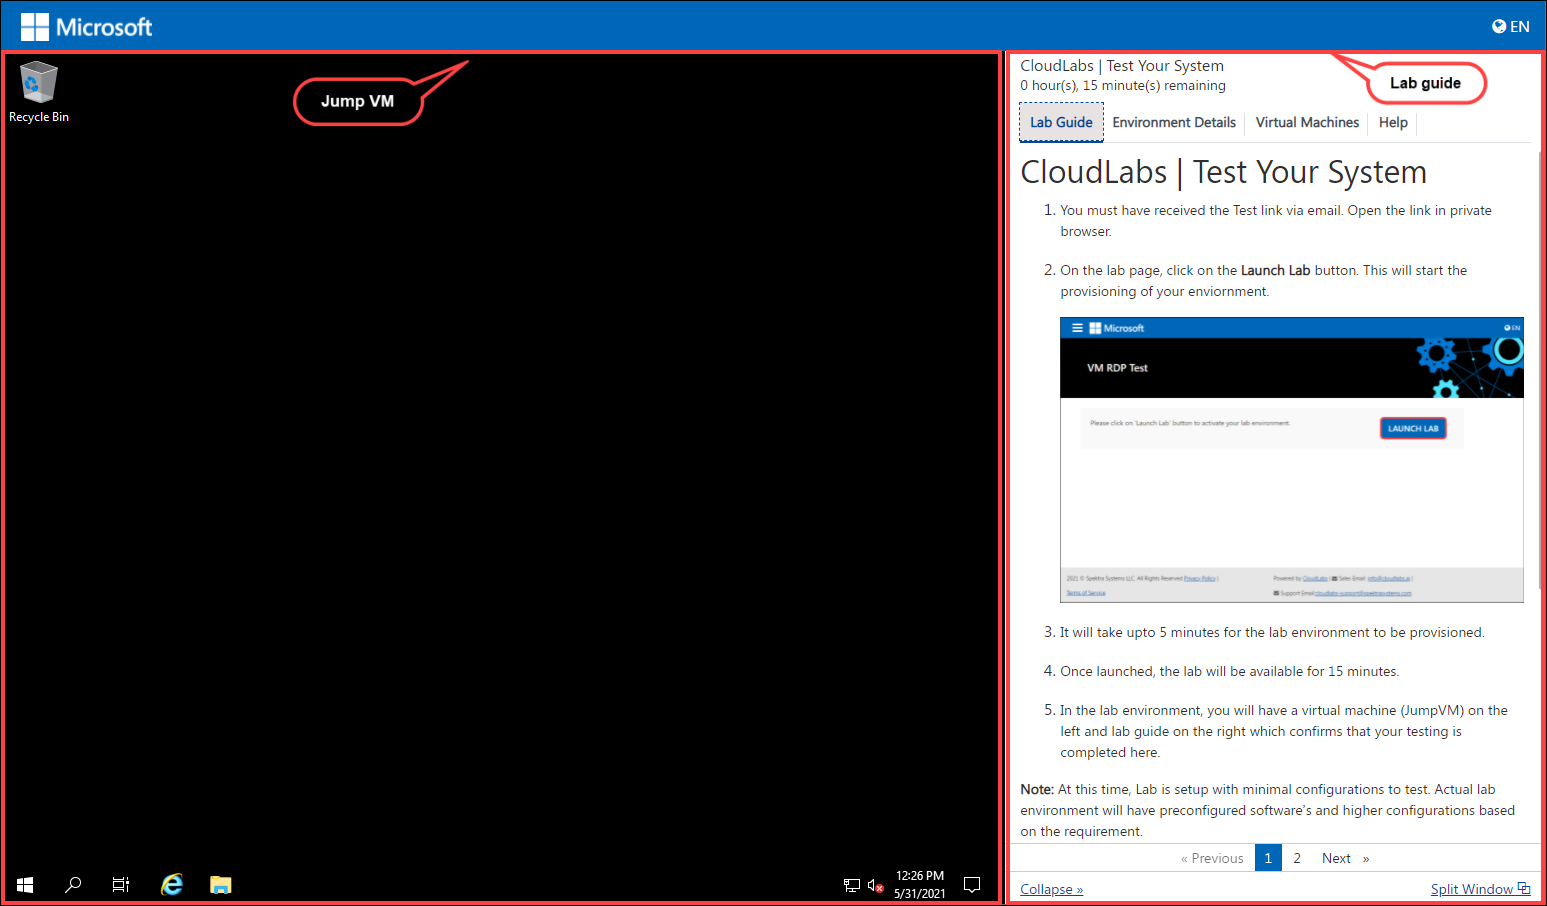
We have a feature named Enable VM Access Over Http that allows you to connect to the VM via browser. When your lab is ready, the environment you receive includes a VM on the left side of the browser and the Lab Guide on the right, as shown below:

For a successful setup of both the VM and the Lab Guide, we have some configurations to be done. In the next sections, we will learn more about the Enable VM Access Over Http feature (which involves the setup of the VM) and for now, we will focus on the master document that involves lab guide setup.
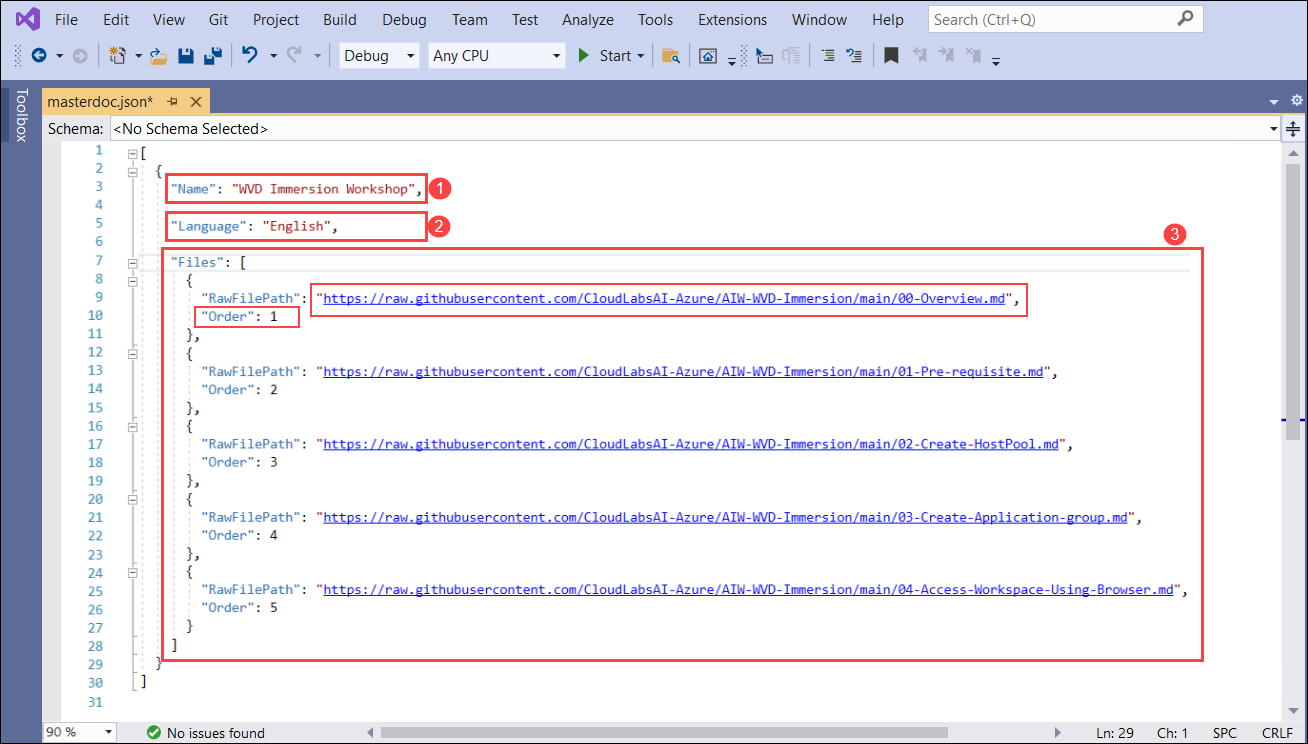
A master document contains the following information:
- Name: Here, you have to provide a name for your lab.
- Language: English
- Files: In this section, we provide the Raw File Path and the order of the file lab guide that should be available on GitHub.
- Raw File Path: This is the raw URL of the pages in your lab guide.
- Order: This defines the sequence of the pages in your lab guide, such as what should come first and so on.
Example: You have a lab guide on GitHub that includes an introduction to the Lab, three exercises to be performed, and a summary. Rather than preparing one lengthy document, we'll break it down into individual pages on GitHub and fetch the Raw URL for each page. We will add the Raw URL of the pages in Raw File Path with respect to the order value.
Therefore, the lab guide's final output will follow the flow shown below:
- Introduction of the Lab
- Exercise 1
- Exercise 2
- Exercise 3
- Summary
For your reference, here is a master document sample - https://cloudlabsai.blob.core.windows.net/master-doc/master-doc.json

Note:: If you want to use a private GitHub repo, please follow this link: https://docs.cloudlabs.ai/Admin/LabDeveloper/EnablingPrivateGitRepotoAuthorLabGuides